登入
打造你的網站
Is Your Video Looking Dull? The Magic of Color Correction Explained
Transform dull videos with color correction! Learn to fix flat footage, understand color grading vs color correction, and achieve vibrant video editing for professional results.
Ever spent hours filming what you thought would be a masterpiece, only to end up with footage that looks flat, lifeless, or just plain dull?

It's a common frustration for content creators and videographers alike. You've captured the perfect moment, the ideal shot, but something feels off. The colors aren't popping, the blacks aren't deep enough, and the overall image lacks that professional polish. This isn't just an aesthetic issue; it can significantly impact how your audience perceives your work and message. A dull video can lead to disengagement, making your content forgettable in a crowded digital landscape. Fortunately, there's a powerful solution that can transform your flat footage into vibrant, captivating visuals: video color correction. In this comprehensive guide, we'll demystify the art and science of color correction, explore why it matters more than you might think, and provide you with a step-by-step workflow to achieve stunning results. We'll delve into the technical adjustments, the creative choices, and the tools that can help you breathe new life into your videos. By the end of this article, you'll understand how color correction is the essential foundation for creating visually consistent, professional, and truly engaging video content.
What Is Color Correction?
At its core, color correction is the process of making technical adjustments to your video footage to achieve a natural, consistent, and accurate representation of colors. Think of it as bringing your video back to a neutral, balanced state. This crucial first step in post-production addresses issues such as incorrect white balance, improper exposure (too dark or too bright), and lack of contrast. The goal is to ensure that colors appear as they would to the human eye under ideal conditions, providing a clean and consistent base for any further creative enhancements. Unlike color grading, which we'll discuss in detail later, color correction is about fixing problems and establishing a baseline of visual truth. It involves a series of precise adjustments using various tools within video editing software. These adjustments include manipulating brightness, contrast, saturation, and hue to achieve a balanced image. For instance, if your footage has a blue tint due to cool lighting conditions, white balance correction would be applied to neutralize that tint and bring the colors back to their natural state.
Understanding color correction also involves familiarity with color theory and the use of scopes. Scopes, such as waveforms and vectorscopes, are indispensable tools that provide objective, numerical data about your video's color and luminance values. They help you identify and correct issues that your eyes might miss, ensuring accuracy and consistency across all your clips. By carefully adjusting these elements, you lay a strong foundation for your video, making it visually appealing and professional.

Why Your Video Might Look Dull
There are several common reasons why your video footage might appear dull, flat, or uninspiring straight out of the camera. Understanding these underlying causes is the first step toward effective video color correction.
One of the primary culprits is flat lighting. If your subject is evenly lit without any significant shadows or highlights, the resulting footage can lack depth and dimension. Overcast days, for instance, often produce very soft, diffuse light that can make everything look muted. While this lighting can be forgiving, it often results in a low-contrast image that needs a boost. Another frequent issue is incorrect white balance. White balance refers to the process of removing unrealistic color casts, so that objects which appear white in person are rendered white in your video. If your camera's white balance setting doesn't match the color temperature of your light source (e.g., shooting under warm indoor lights with a daylight white balance setting), your video will have an undesirable color cast, making it appear off-color and dull. This is a common reason why you might need to fix dull video. Low contrast is also a major contributor to dullness. Contrast is the difference between the darkest and brightest parts of an image. If your video lacks sufficient contrast, the blacks might look milky, and the whites might appear muddy, leading to a washed-out appearance. This often happens in situations with poor lighting or when shooting with certain camera profiles. Inconsistent camera settings or mixing footage from different cameras can also result in a dull and disjointed final product. Each camera might have a slightly different color science or default settings, leading to variations in exposure, color, and saturation between clips. Without proper video color correction, these inconsistencies will be glaringly obvious to your viewers, detracting from the overall professionalism of your project. Finally, many professional videographers choose to shoot in "flat" or LOG profiles. These profiles are designed to capture the maximum amount of dynamic range from the camera's sensor, preserving detail in both the highlights and shadows. However, footage shot in LOG looks inherently desaturated and low contrast straight out of the camera. While this provides immense flexibility in post-production, it means that this footage absolutely requires color correction to bring it back to life and achieve vibrant video editing. Without this crucial step, LOG footage will always look lifeless.
The Benefits of Color Correction
The impact of well-executed color correction extends far beyond simply making your video look "better." It's a foundational process that unlocks a multitude of benefits, elevating your content from amateur to professional.
First and foremost, color correction ensures natural color accuracy. By correcting white balance, exposure, and contrast, you restore the true colors of your scene, making everything appear as it would in real life. This authenticity builds trust with your audience and enhances the overall viewing experience. Imagine a product video where the colors of the product are inaccurate – this could lead to customer dissatisfaction.
Secondly, it leads to enhanced clarity and detail. When exposure is properly balanced and contrast is optimized, details that might have been lost in overly dark shadows or blown-out highlights become visible. This sharpens your image, making textures and fine elements more discernible, contributing to a much more polished look.
Crucially, color correction provides visual consistency across clips. Whether you've shot with multiple cameras, in varying lighting conditions, or over an extended period, color correction allows you to standardize the look and feel of all your footage. This seamless transition between shots is vital for professional storytelling, preventing jarring visual shifts that can pull viewers out of the narrative. Inconsistent footage is a hallmark of an unpolished production.
Moreover, color correction establishes a strong foundation for subsequent creative grading. Once your footage is corrected to a neutral, accurate state, it becomes a perfect canvas for color grading. You can then apply specific stylistic looks, mood-enhancing tones, and cinematic aesthetics without having to fight against underlying color inaccuracies. Without proper video color correction, any attempts at creative grading will likely result in an artificial or unappealing look. It’s like trying to paint a masterpiece on a dirty, uneven surface – the final result will always be compromised.
Ultimately, the benefits of color correction culminate in a more professional and engaging final product. Viewers are more likely to stay engaged with content that is visually pleasing and consistent. For content creators and businesses, this translates to higher retention rates, better brand perception, and ultimately, greater success for their video initiatives. If you want to fix dull video, color correction is your first and most important step.
Step-by-Step Guide to Color Correction
Mastering color correction doesn't have to be daunting. With a systematic approach, you can consistently achieve professional results. Here's a detailed, step-by-step guide to help you transform your dull video into something truly remarkable.
Step 1: Import Your Footage
The first step is to import all your video clips into your chosen video editing software. Popular options include DaVinci Resolve, Adobe Premiere Pro, Filmora, and Shotcut. Organize your clips in your project bin and then drag them onto your timeline.
Step 2: Choose Your Hero Shot or Reference Frame
Before you start making adjustments, select a "hero shot" or a good reference frame within a clip that is representative of the lighting and conditions of the majority of your footage. This will serve as your benchmark for color consistency. Ideally, this shot should contain a neutral gray or white object, or a skin tone, which can aid in accurate adjustments.
Step 3: Apply Input LUT for Flat/LOG Footage (If Applicable)
If you've shot your footage in a flat or LOG profile (such as S-Log, V-Log, or C-Log), the very first adjustment you should make is to apply an input Look Up Table (LUT) provided by your camera manufacturer. This LUT will de-log your footage, bringing it back to a standard Rec.709 color space and providing a more "normal" starting point for your corrections. This is a crucial step to how to color correct footage shot in LOG.
Step 4: Correct White Balance and Temperature
This is often the most impactful step for fixing dull video. Your goal here is to neutralize any color casts and ensure that whites appear truly white and grays appear truly gray.
- Eyedropper Tool: Many editing software provide a white balance eyedropper tool. Click this tool and then select a known neutral gray or white area in your image. The software will automatically adjust the color temperature and tint to neutralize the image.
- Manual Sliders: If an eyedropper isn't available or doesn't yield perfect results, use the temperature and tint sliders. Move the temperature slider towards blue if your footage is too warm (orange/yellow) or towards orange if it's too cool (blue). Adjust the tint slider to compensate for magenta or green casts. Always use a reference point, like a gray card if you shot one, or a neutral object in the scene.

Step 5: Adjust Exposure and Contrast
Once your white balance is set, focus on your video's luminance.
- Exposure: Use the exposure slider to adjust the overall brightness of your image. Your goal is to ensure that highlights aren't completely blown out (pure white with no detail) and shadows aren't completely crushed (pure black with no detail).
- Contrast: Increase or decrease the contrast to achieve a pleasing range between the brightest and darkest parts of your image. A lack of contrast is a primary reason for a dull video. Use the waveform scope to guide you; your goal is usually to have your luminance values fill the entire range without clipping at the very top (highlights) or very bottom (shadows).
- Highlights, Midtones, Shadows: Many tools also offer specific controls for highlights, midtones (gamma), and shadows. Adjust these to fine-tune your dynamic range. For example, lift shadows slightly to reveal detail, or pull down highlights to recover detail in bright areas.
Step 6: Tweak Saturation and Vibrance
With exposure and contrast in place, it’s time to address color intensity.
- Vibrance: Vibrance intelligently boosts the saturation of less-saturated colors while leaving already saturated colors and skin tones relatively untouched. This is often a great starting point for making colors pop without looking artificial.
- Saturation: The saturation slider globally increases or decreases the intensity of all colors in your image. Use this cautiously. Over-saturating can make your footage look garish and unnatural, especially skin tones. Always protect skin tones by not pushing saturation too far.
Step 7: Match Shots Across Your Timeline
Consistency is key. After correcting your hero shot, apply similar adjustments to all other clips in your timeline. Use your corrected hero shot as a visual reference. Many editing programs allow you to copy and paste color correction attributes from one clip to another. Then, make minor, clip-specific adjustments to account for variations in lighting or camera settings. This is crucial for video color correction in a multi-clip project.
Step 8: Optionally Perform Secondary Corrections
Once your primary color correction is complete, you might want to perform secondary corrections for specific elements.
- Masks: Use masks to isolate specific areas of your image for targeted adjustments. For example, you might want to brighten a face or darken a distracting background element.
- HSL Isolation: Hue, Saturation, and Luminance (HSL) tools allow you to select a specific color range and adjust only that range. For instance, you could increase the saturation of only the green in trees or change the hue of a particular object.
- Track Moving Subjects: Some advanced software allows you to track a moving subject and apply corrections that follow them, ensuring consistent adjustments throughout the shot.
Sub-instructions for Precision:
- Use Scopes Religiously: Waveform, Vectorscope, and Histogram scopes provide objective data about your image. They are essential for accurate color correction, helping you avoid guessing and ensuring your adjustments are precise.
- Reference Monitor: Whenever possible, use a properly calibrated reference monitor. Your computer's display might not be accurate, leading to skewed perceptions of color and brightness.
- Calibrated Environment: Work in a dimly lit, color-neutral environment. Wall colors or strong ambient light can trick your eyes into perceiving colors differently, leading to inaccurate corrections.
By following these steps, you'll gain the confidence and skill to how to color correct footage effectively, turning dull video into visually stunning content.
Color Correction vs. Color Grading
While often used interchangeably by beginners, color correction and color grading are distinct processes with different objectives, even though they both involve manipulating color in video. Understanding the difference is crucial for achieving professional results and for knowing how to fix dull video versus styling it.
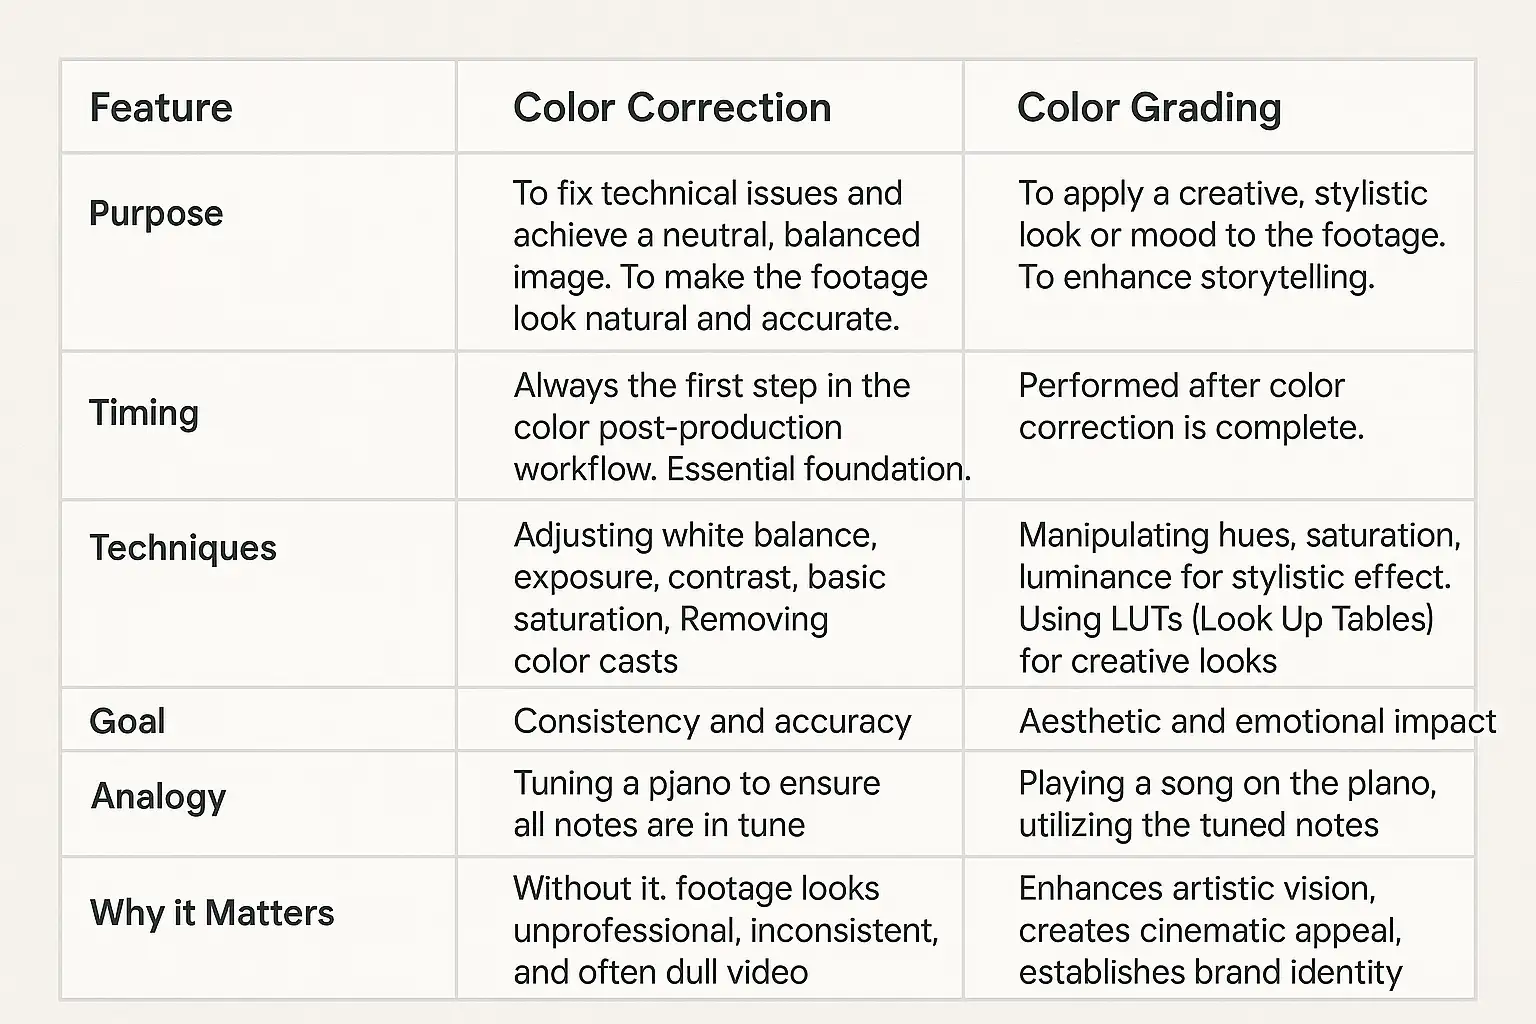
Table comparing color correction and color grading in video production. Rows include Purpose, Timing, Techniques, Goal, Analogy, and Why it Matters. Each row highlights the technical accuracy and foundational role of color correction versus the creative, stylistic focus of color grading.In essence, color correction is about establishing visual truth. It's about ensuring that a white object looks white, that skin tones are natural, and that the overall brightness and contrast are appropriate. It's a corrective process designed to rectify technical imperfections from the camera or shooting environment. If your footage is too blue, too green, too dark, or too bright, color correction is the solution. It's the essential first step to fix dull video at its root.
Color grading, on the other hand, is a creative process. Once your footage is corrected and looking natural, color grading allows you to imbue it with a specific mood, atmosphere, or cinematic style. This could involve making a scene look warm and inviting, cool and mysterious, gritty and desaturated, or vibrant and punchy. Color grading often involves using advanced tools to manipulate individual colors, create specific lighting effects, and apply various artistic filters or LUTs. While color correction makes your video accurate, color grading makes it art.
Therefore, you always color correct before you color grade. A well-corrected image provides a stable and accurate canvas for your creative grading choices. Trying to grade uncorrected footage is like building a house on a shaky foundation – no matter how beautiful the house, its structural integrity will be compromised. If your goal is truly vibrant video editing, both processes are indispensable, but in a specific order.
Tools & Software Overview
The world of video editing offers a robust selection of software solutions, each with varying capabilities for color correction and color grading. Choosing the right tool often depends on your budget, skill level, and the complexity of your projects.
Professional-Grade Software:
- DaVinci Resolve: Widely considered the industry standard for color correction and color grading, DaVinci Resolve offers an incredibly powerful and comprehensive suite of tools. Its free version is remarkably feature-rich, making it an excellent choice for aspiring professionals. It boasts advanced scopes, intricate node-based workflows, and exceptional control over every aspect of color. If you're serious about how to color correct footage and achieve vibrant video editing, Resolve is a top contender.
- Adobe Premiere Pro (with Lumetri Color): Premiere Pro is a leading non-linear editor, and its integrated Lumetri Color panel provides robust color correction and color grading capabilities. It's known for its user-friendly interface and seamless integration with other Adobe Creative Cloud applications. Lumetri offers a wide array of sliders and tools, including a versatile curves panel and HSL secondary corrections, making it a strong option for comprehensive video color correction.
User-Friendly Options:
- Filmora: Designed for ease of use, Filmora by Wondershare offers intuitive color correction tools that are perfect for beginners. While not as granular as professional software, it provides essential adjustments for white balance, exposure, and saturation, allowing users to quickly fix dull video without a steep learning curve.
- Shotcut: As a free and open-source video editor, Shotcut provides a surprising amount of color correction functionality. It includes basic adjustments, scopes, and even some filters that can help improve the look of your footage. It's a great entry point for those looking to experiment with color correction without investing financially.
- Blackmagic Design DaVinci Resolve (Studio Version): While the free version is powerful, the paid Studio version of DaVinci Resolve unlocks even more advanced features, including AI-powered tools, noise reduction, and advanced HDR capabilities, making it ideal for high-end productions.
Key Features to Look For:
When evaluating color correction software, several key features are essential:
- LUT Support: The ability to import and apply both input LUTs (for flat/LOG footage) and creative LUTs (for stylistic grading) is crucial.
- Scopes (Waveform, Vectorscope, Histogram, Parade): These visual tools are indispensable for accurate and objective color correction. They provide numerical data about your image's luminance and color distribution, helping you avoid subjective errors.
- Precise Controls: Look for tools that offer fine-tuned control over exposure, contrast, white balance (temperature and tint), highlights, midtones, shadows, and individual color channels.
- Secondary Correction Tools: Features like HSL (Hue, Saturation, Luminance) qualifiers, masks, and power windows allow you to isolate and adjust specific areas or colors in your footage.

Achieving excellent color correction goes beyond just knowing the tools; it involves developing an informed workflow and avoiding common pitfalls. Here are some pro tips and mistakes to steer clear of when working to fix dull video and achieve vibrant video editing.
Pro Tips for Optimal Color Correction:
- Use Vibrance Before Saturation: When boosting colors, always start with the vibrance slider. Vibrance intelligently increases the intensity of desaturated colors while protecting already saturated areas, particularly skin tones. This results in a more natural and pleasing color enhancement compared to simply cranking up global saturation, which can easily make your footage look artificial.
- Calibrate Your Monitor: This cannot be stressed enough. An uncalibrated monitor will display colors inaccurately, leading you to make incorrect adjustments. Invest in a monitor calibration device or use built-in calibration tools on your operating system (though a dedicated device is superior). Work in a neutral environment with controlled lighting to avoid external color casts influencing your perception.
- Trust Your Scopes More Than Your Eyes: While your eyes are important for subjective assessment, scopes (waveform, vectorscope, histogram) provide objective, numerical data about your image. If your waveform shows crushed blacks or clipped highlights, trust the scope and adjust accordingly, even if it "looks okay" on your monitor. Scopes are your best friends for accurate video color correction.
- Reference Your Hero Shot Consistently: Keep your corrected hero shot open in your viewer or on a second monitor as a constant reference. This helps you maintain consistency across all your clips, ensuring a cohesive look throughout your project.
- Watch on Multiple Screens: Once you've completed your color correction, watch your video on various screens – a different monitor, a laptop, a tablet, and a smartphone. Colors can look different on different displays, and this step helps you catch any discrepancies before final export. This is crucial to ensure your vibrant video editing translates well everywhere.
- Shoot a Gray Card or Color Chart: For critical projects, always start by shooting a gray card or a color checker chart at the beginning of your takes. This provides a perfect neutral reference point for incredibly accurate white balance and exposure adjustments in post-production, greatly simplifying the process of how to color correct footage.

- Oversaturation: One of the most common mistakes is pushing saturation too far. This results in unnatural, cartoonish colors, especially affecting skin tones, making them appear jaundiced or overly red. Always aim for natural-looking saturation.
- Crushing Blacks or Clipping Highlights: Driving your black levels too low can lead to "crushed blacks" where all detail in the shadows is lost. Conversely, pushing highlights too high results in "clipped whites" where bright areas become pure white blobs with no detail. Use your waveform scope to ensure your luminance levels stay within the safe range.
- Ignoring White Balance: Neglecting to correct white balance is a primary reason for a dull video. Incorrect white balance can throw off all other color adjustments, leading to an overall unpleasant look. Always prioritize this step.
- Relying Solely on Eyeballing: While your artistic eye is important for creative choices, solely relying on it for technical color correction is a recipe for inconsistency and inaccuracy, especially when working on different projects or over long periods.
- Applying Creative LUTs Before Correction: While LUTs are powerful, applying a creative LUT to uncorrected, flat, or improperly exposed footage will often yield poor results. Always perform your primary color correction first, getting your footage to a neutral state, before applying any stylistic LUTs. Remember, color correction vs grading is a sequence.
- Inconsistent Corrections: Applying different corrections to similar shots within the same scene will create jarring visual discontinuities for the viewer. Strive for visual consistency across your timeline.
By adopting these pro tips and diligently avoiding these common mistakes, you'll significantly improve your video color correction skills and consistently produce high-quality, vibrant video editing that captivates your audience.
FAQs
Here are some frequently asked questions about color correction and color grading to help clarify common confusions and provide practical insights.
What is the difference between color correction & grading? Color correction is the technical process of fixing errors and achieving a neutral, accurate image (e.g., correcting white balance, exposure, contrast) to make it look true to life. Color grading is the creative process of applying a specific aesthetic or mood to the footage after it's been corrected, enhancing the storytelling and overall look. Think of color correction vs grading as fixing something first, then styling it.
Can I color correctly on my mobile? Yes, many mobile video editing apps now offer basic color correction tools, including adjustments for exposure, contrast, saturation, and even some white balance controls. While they may not offer the granular control of professional desktop software, they can certainly help you fix dull video for quick edits and social media content. Popular apps include CapCut, KineMaster, and InShot.
Why does white balance matter? White balance is critical because it ensures that white objects in your video appear truly white, and all other colors are rendered accurately. Incorrect white balance leads to undesirable color casts (e.g., a yellow tint from indoor lights or a blue tint from outdoor shade), making your footage look unnatural and often dull video. It's the foundation for all other color adjustments.
What are scopes and why use them? Scopes are graphical tools (like waveform, vectorscope, and histogram) in video editing software that provide objective, numerical data about the luminance (brightness) and chrominance (color) of your video. They are essential for accurate color correction because they show you precise values, helping you identify and correct issues like clipped highlights, crushed shadows, and color casts that your eyes might miss due to monitor calibration or environmental factors.
Should I use LUTs? LUTs (Look Up Tables) can be very useful. There are two main types: input LUTs and creative LUTs. Input LUTs are essential for de-logging flat or LOG footage, bringing it back to a standard color space. Creative LUTs can apply a stylistic look or "grade" to your footage. Always apply an input LUT first if needed, and then perform your primary color correction. Only after your footage is correctly balanced should you consider applying a creative LUT for stylistic purposes. They can be a great starting point for vibrant video editing.
Do I always need grading after correction? Not necessarily. While color grading enhances the artistic vision, it's not always mandatory. For many projects, especially corporate videos, documentaries, or news reports, a solid color correction that ensures natural, consistent, and accurate colors is sufficient. The need for color grading depends on the desired aesthetic and the overall creative intent of your project. However, if you want a distinct cinematic or branded look, then color grading is crucial.
Transformation
The journey from dull video footage to truly captivating visual content often begins and ends with the magic of color correction. It's more than just a technical tweak; it's the fundamental process that brings your video to life, ensuring natural color accuracy, visual consistency, and overall professionalism. By meticulously adjusting elements like white balance, exposure, and contrast, you lay an unshakeable foundation for any further creative enhancements. We've explored why footage can look flat, delved into the step-by-step process of how to color correct footage, differentiated between color correction vs grading, and highlighted the essential tools and common pitfalls to avoid. Understanding these principles and consistently applying best practices will undoubtedly elevate the quality of your video projects. Remember, precise video color correction is the first and most critical step towards achieving vibrant video editing. Don't let your hard work behind the camera be undermined by lifeless visuals. Embrace the power of color correction to transform your raw footage into stunning, engaging narratives. The difference it makes is profound, and the skills you gain are invaluable for any content creator or videographer. Start color correcting your videos today—and prepare to see a dramatic difference in your before-and-after results!

Ready to transform your dull videos into visually stunning masterpieces?
Learn more about AI-powered video editing and create your own vibrant content with Wegic!

撰寫者
Kimmy
發布於
Jul 28, 2025
分享文章
閱讀更多
我們的最新博客
Wegic 助你瞬間打造網頁!
透過 Wegic,利用先進的 AI 將你的需求轉化為驚艷且實用的網站
使用Wegic免費試用,一鍵建立你的網站!