Log in
Build Your Site
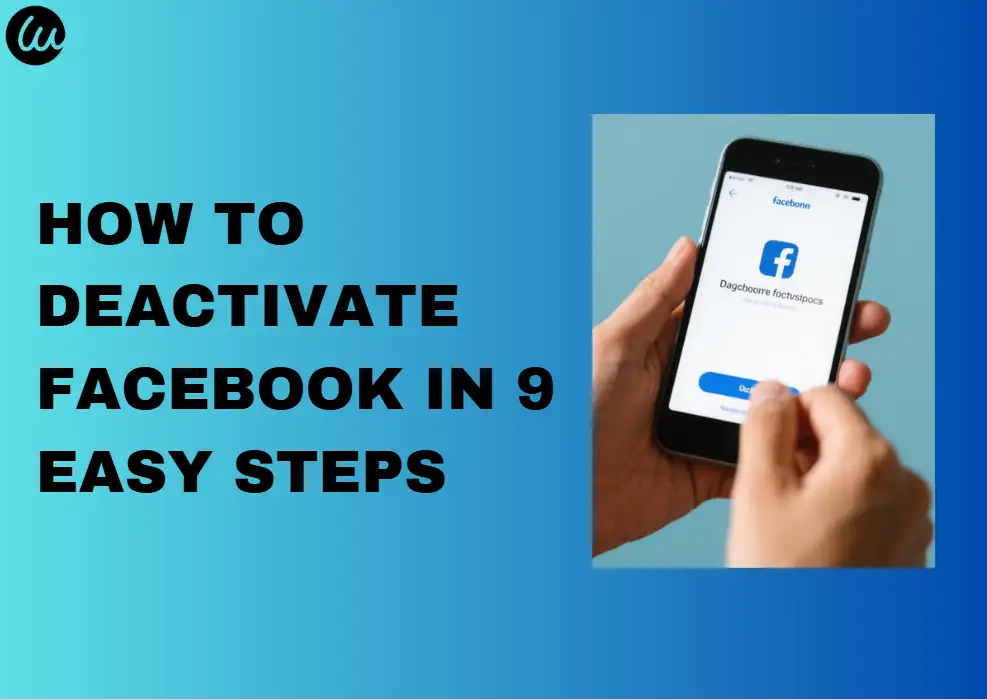
How to Deactivate Facebook in 10 Easy Steps
Learn how to deactivate Facebook in 10 easy steps, including managing pages, Messenger, and Android devices. Protect your privacy with this 2025-updated guide.

Have you ever encountered such a situation? Do you find the numerous notifications and privacy issues of social media appsannoying, or have you ever thought about completely stopping using these social media apps? Now, according to surveys, more than 34% of users consider stopping Facebook every year. However, many people still don’t know how to deactivate Facebook or fear their data will be leaked. It doesn’t matter, this guide will solve the above problems for you.
Whether you want to deactivate Facebook temporarily, show your brand, or are afraid of losing Messenger access, we have broken down this goal into ten simple and easy steps.
Finally, you can learn how to safely stop Facebook, retain data management rights for related applications, and maintain network security. Let’s take a look together.
Quickly learn how to deactivate your Facebook
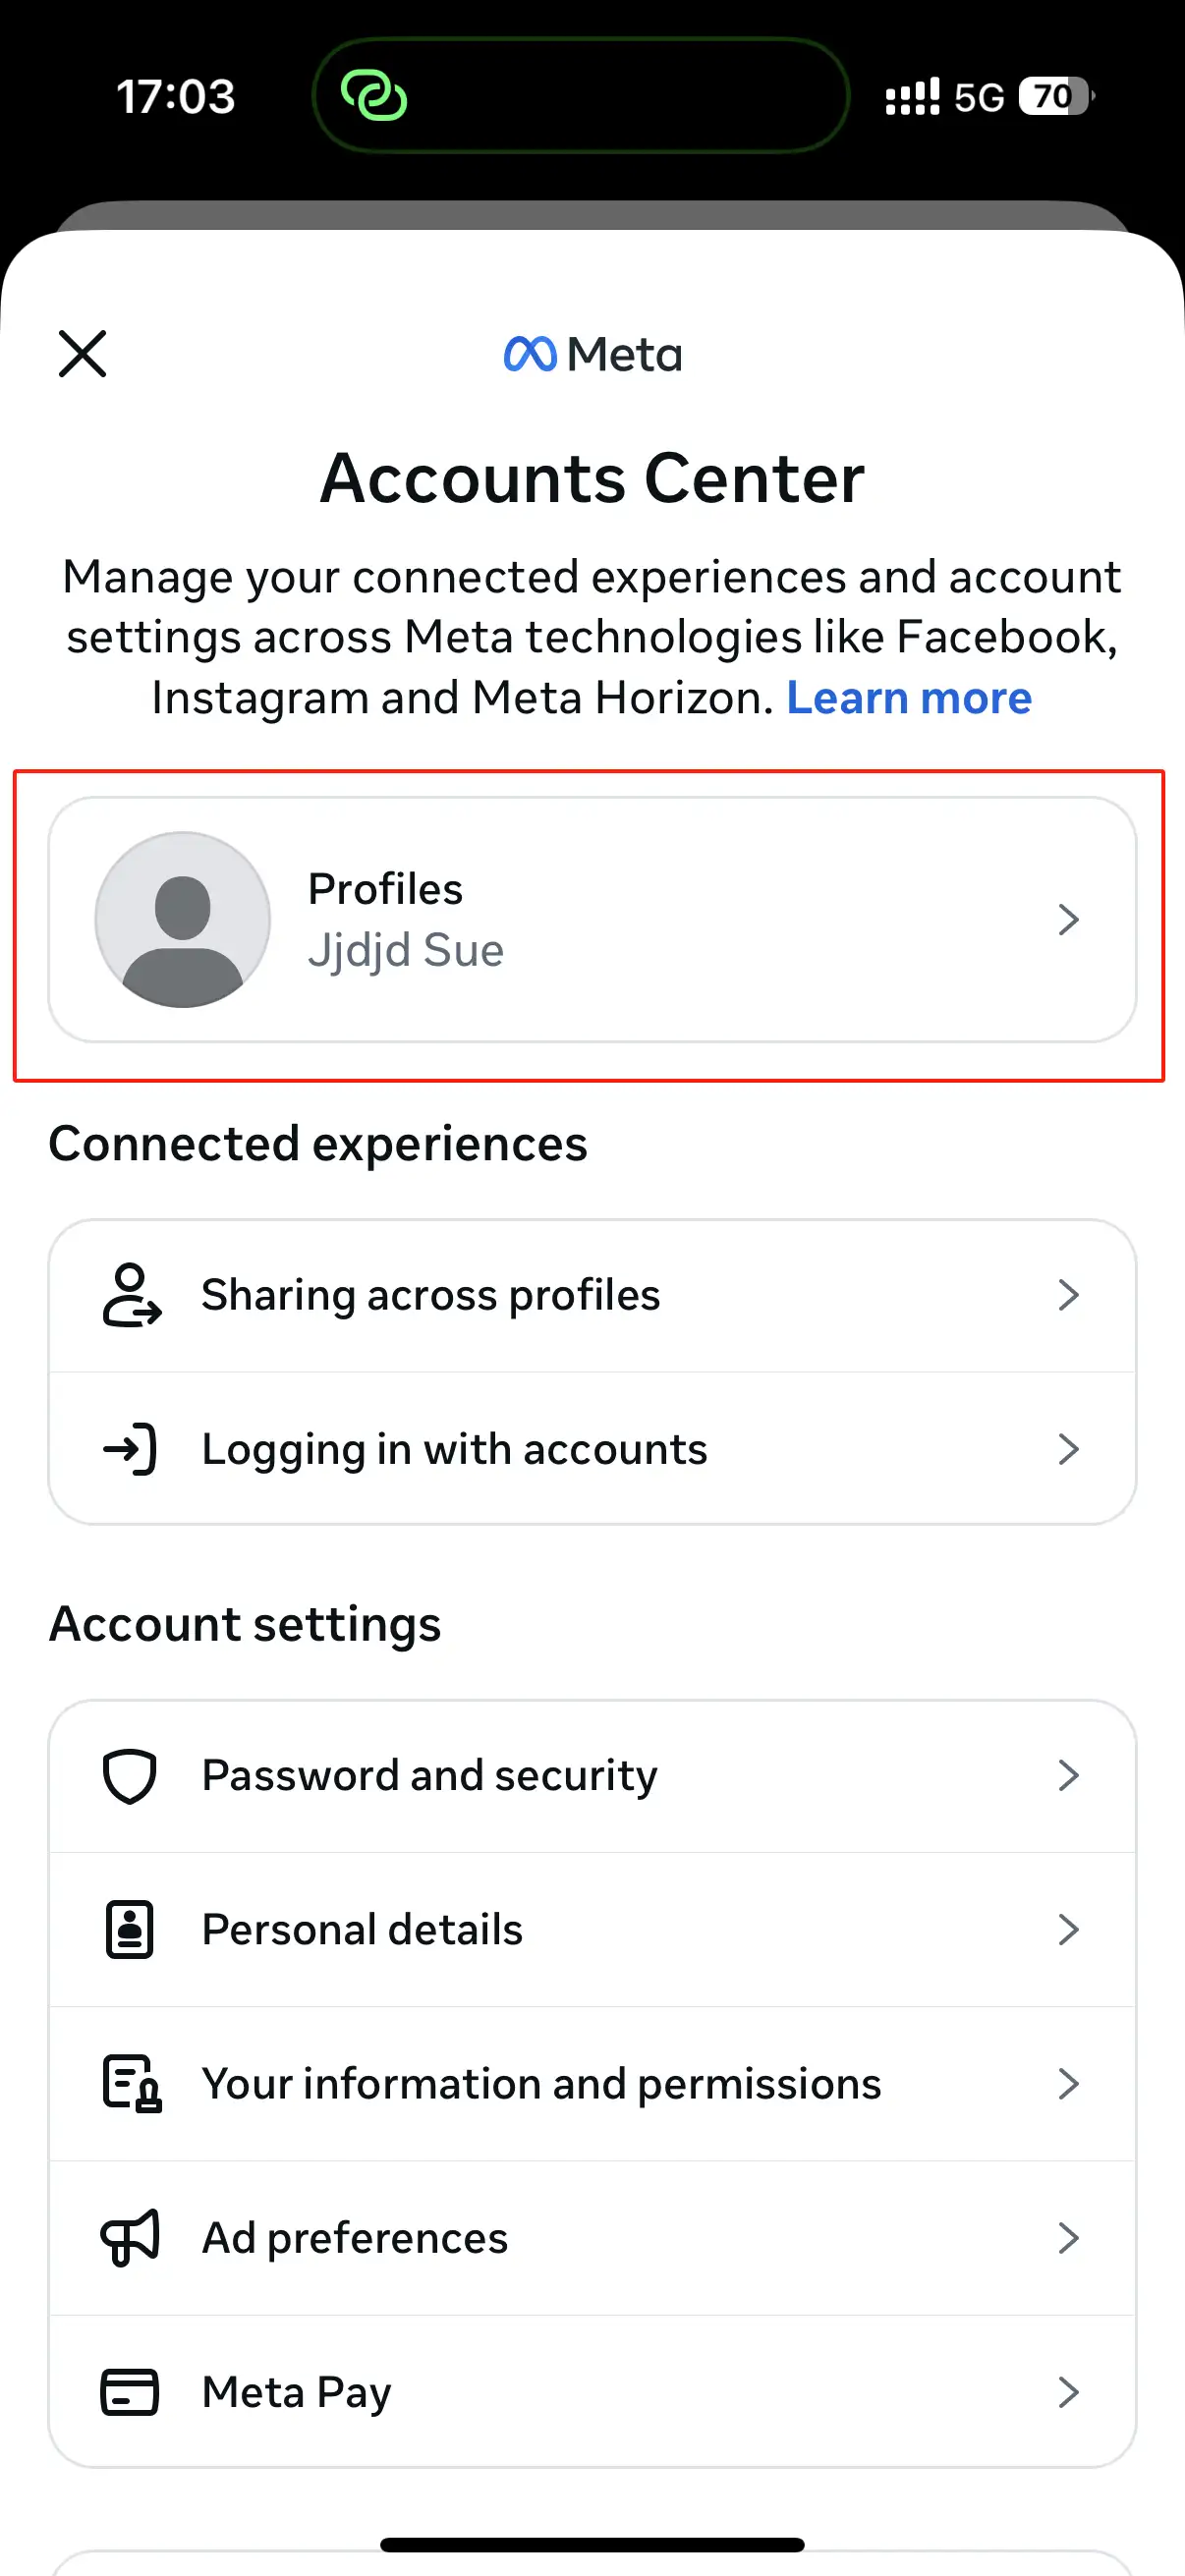
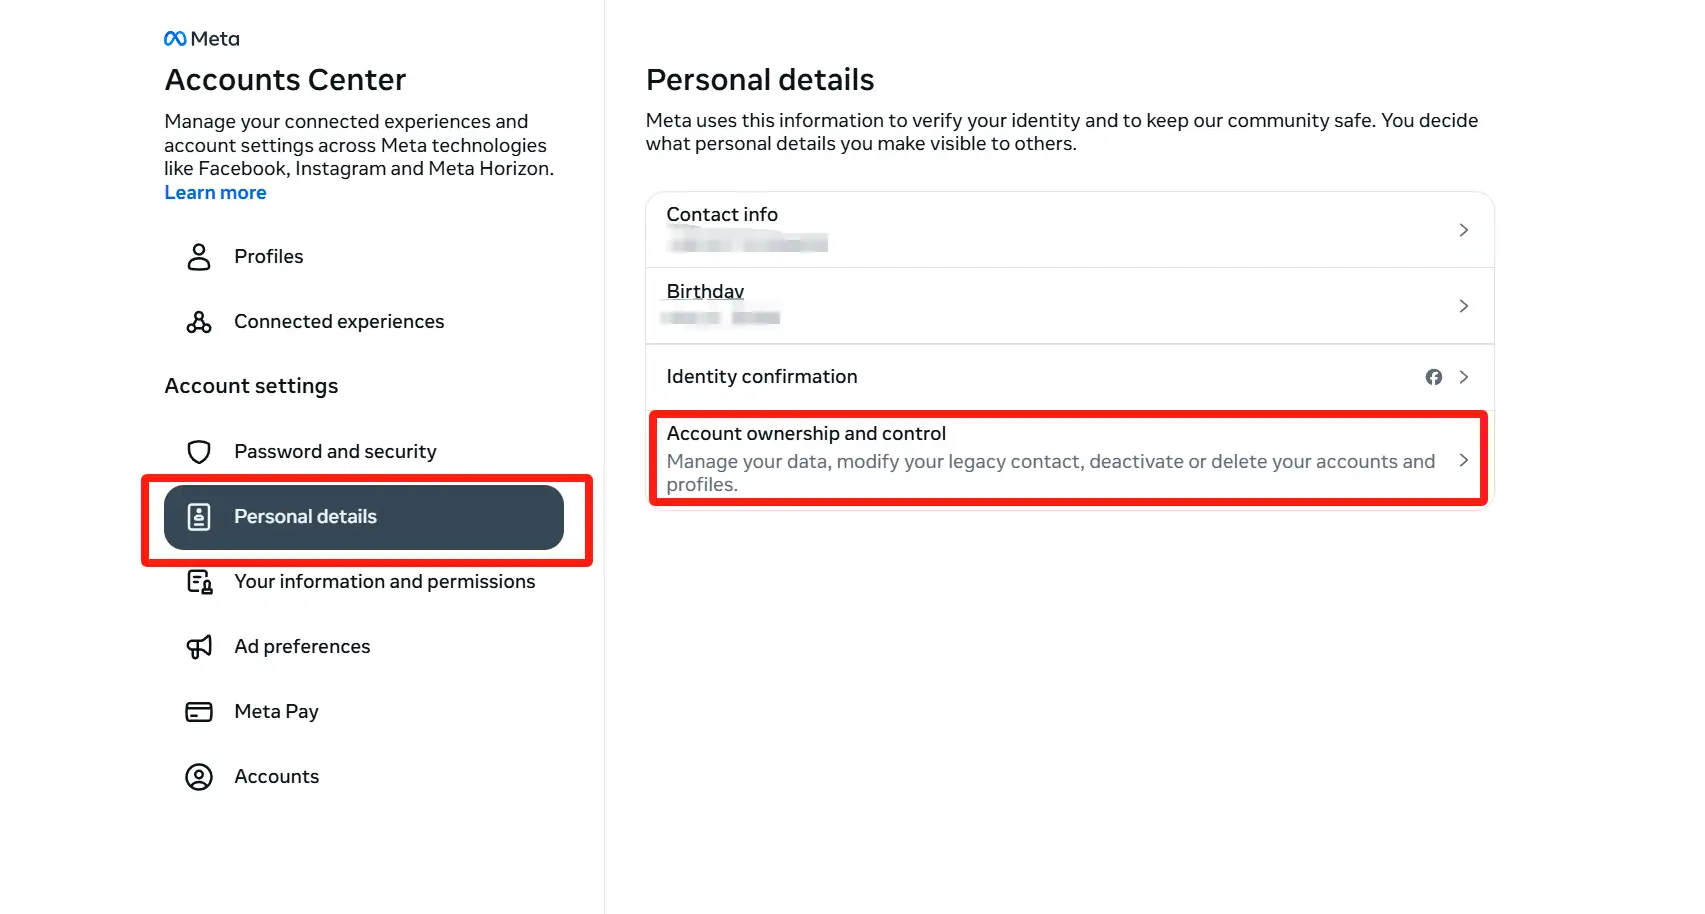
How to deactivate Facebook? Actually, it's very simple. You can choose to deactivate your Facebook account in the new account center by selecting "Personal Information" > "Account Ownership and Control" > "Deactivate or Delete". If you don't have the latest version of the account center, you can also deactivate your Facebook account through Facebook's settings.
How to deactivate your Facebook account: A step-by-step guide.
To deactivate your Facebook account, the most important thing you need to do is find the Account Center's location in Settings. However, the location of settings varies on different devices, so you need to find "Settings" first, which is a key step.
-
If you are using a mobile phone, you need to find the menu button, which is located in the upper right corner of Android devices and the lower right corner of iPhone/iPad devices.
-
If you are using a computer, you can click on the profile picture in the upper right corner on PC and Mac devices.
-
On desktop devices, click the "Settings" option in the "Settings and Privacy" menu, and then find the Account Center.
If the Account Center is at the top of the settings (upper left corner of the desktop), you can deactivate your account through the Account Center.
If the Account Center is at the bottom of the settings (lower left corner of the desktop), you can deactivate your account through Facebook settings.
How to Deactivate Facebook in 10 Easy Steps(mobile phone)
Step 1: Deactivate on mobile device (Account Center)
You need to open Facebook, then go to the "Settings and Privacy" page and tap "Account Center".

Step 2: Click "Personal Information"
Then, click "Personal Information." This option is located under the "Account Settings" heading and can be seen by scrolling down.
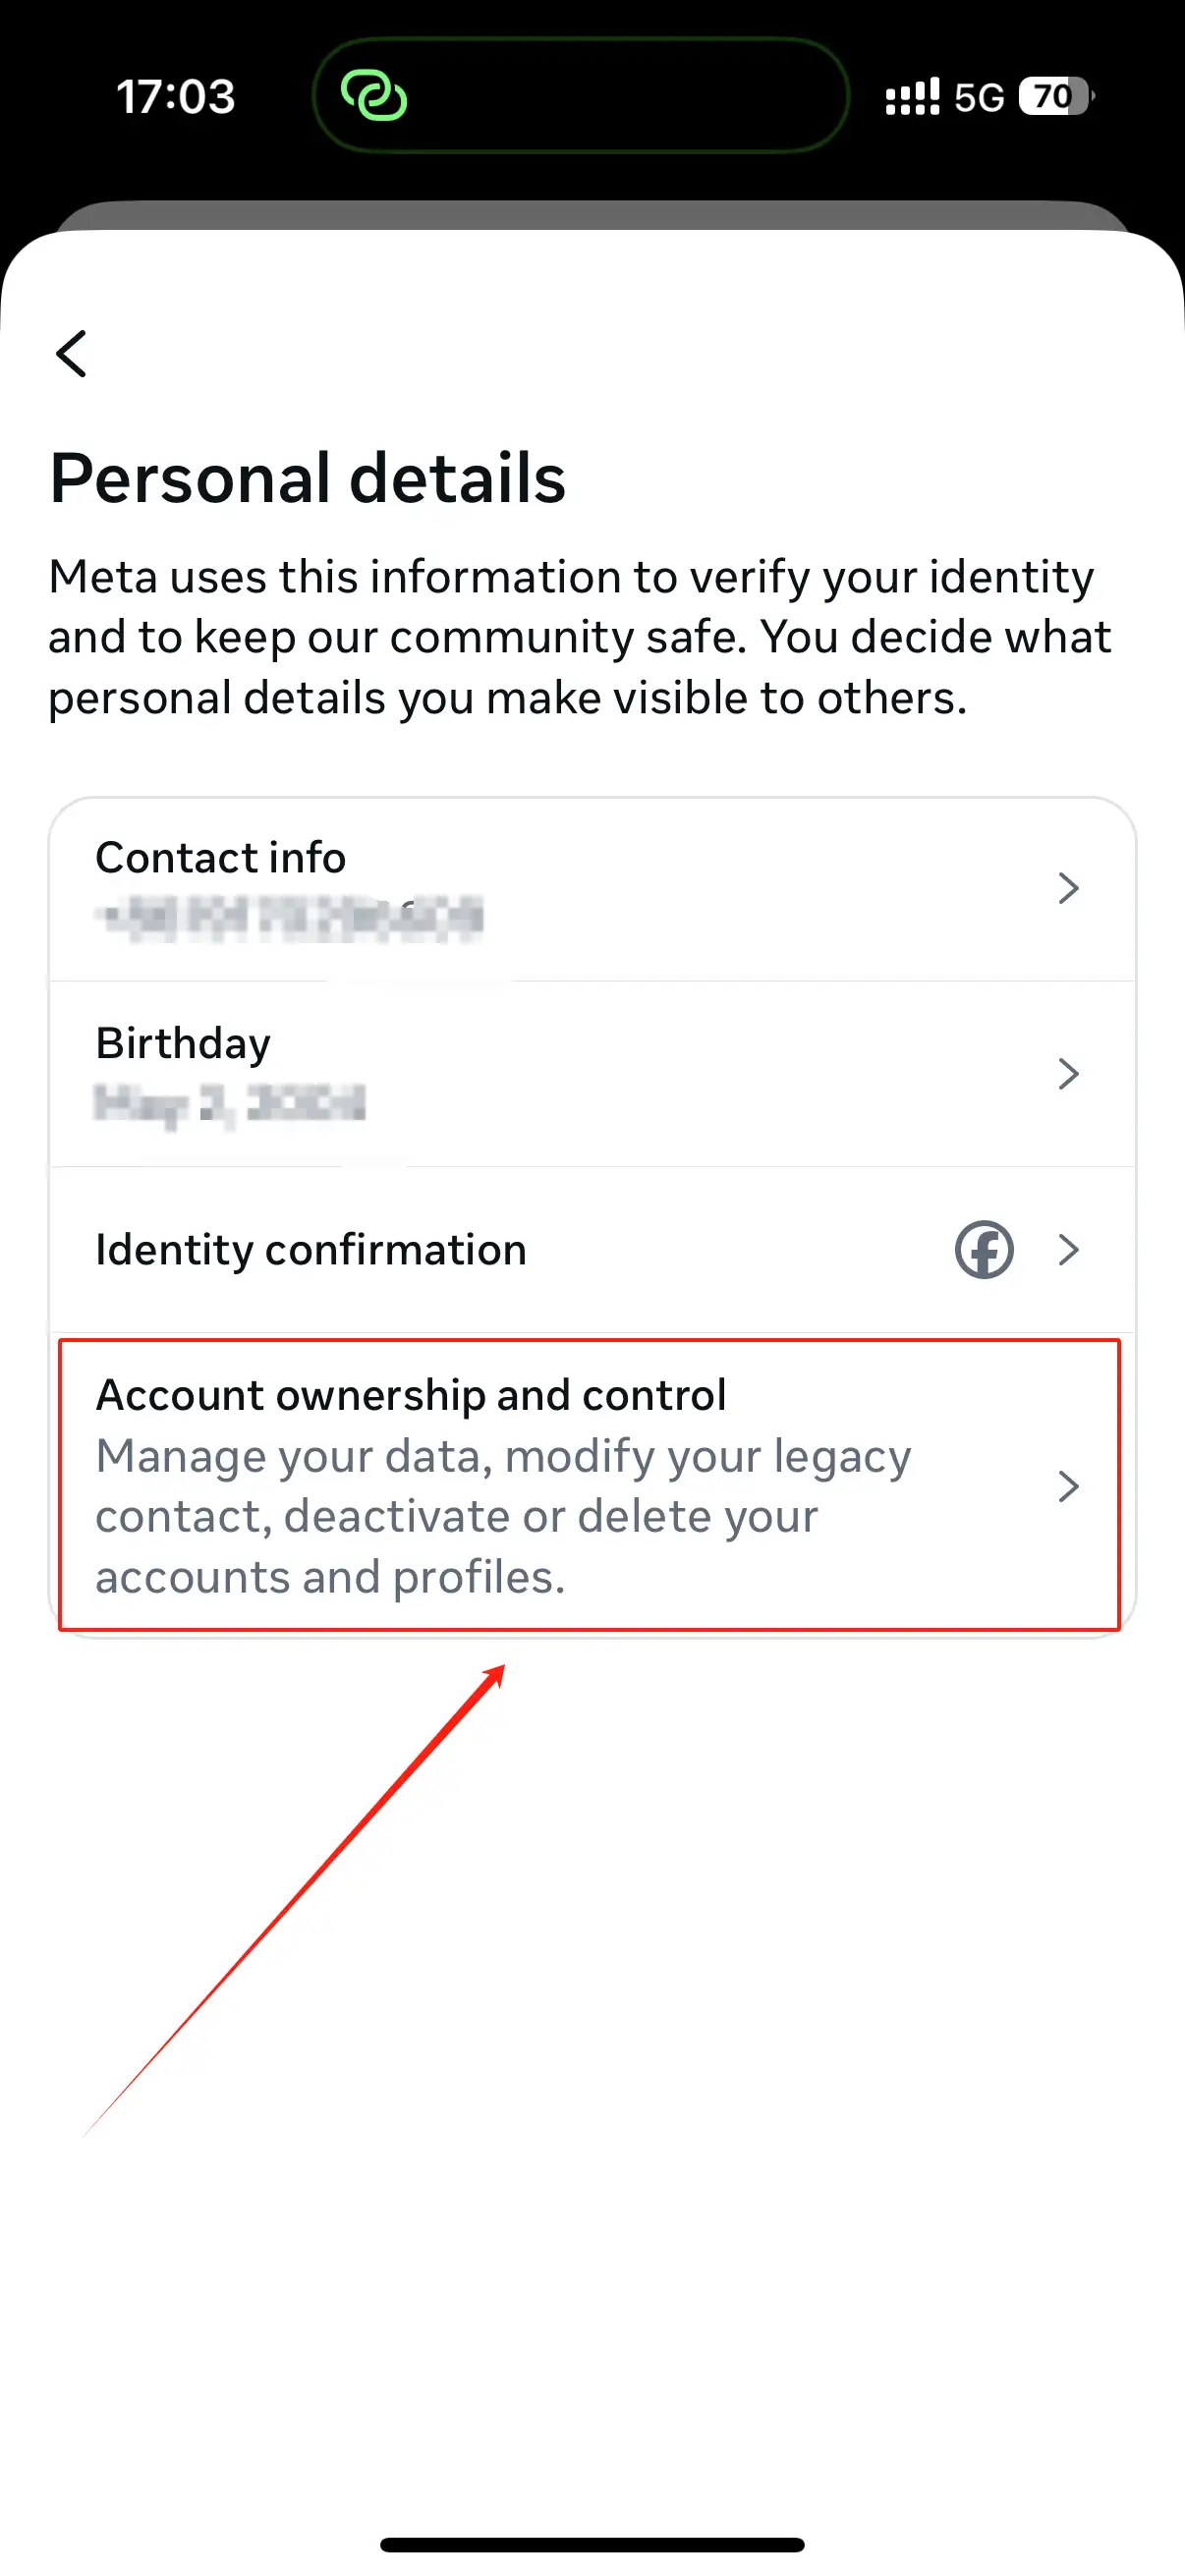
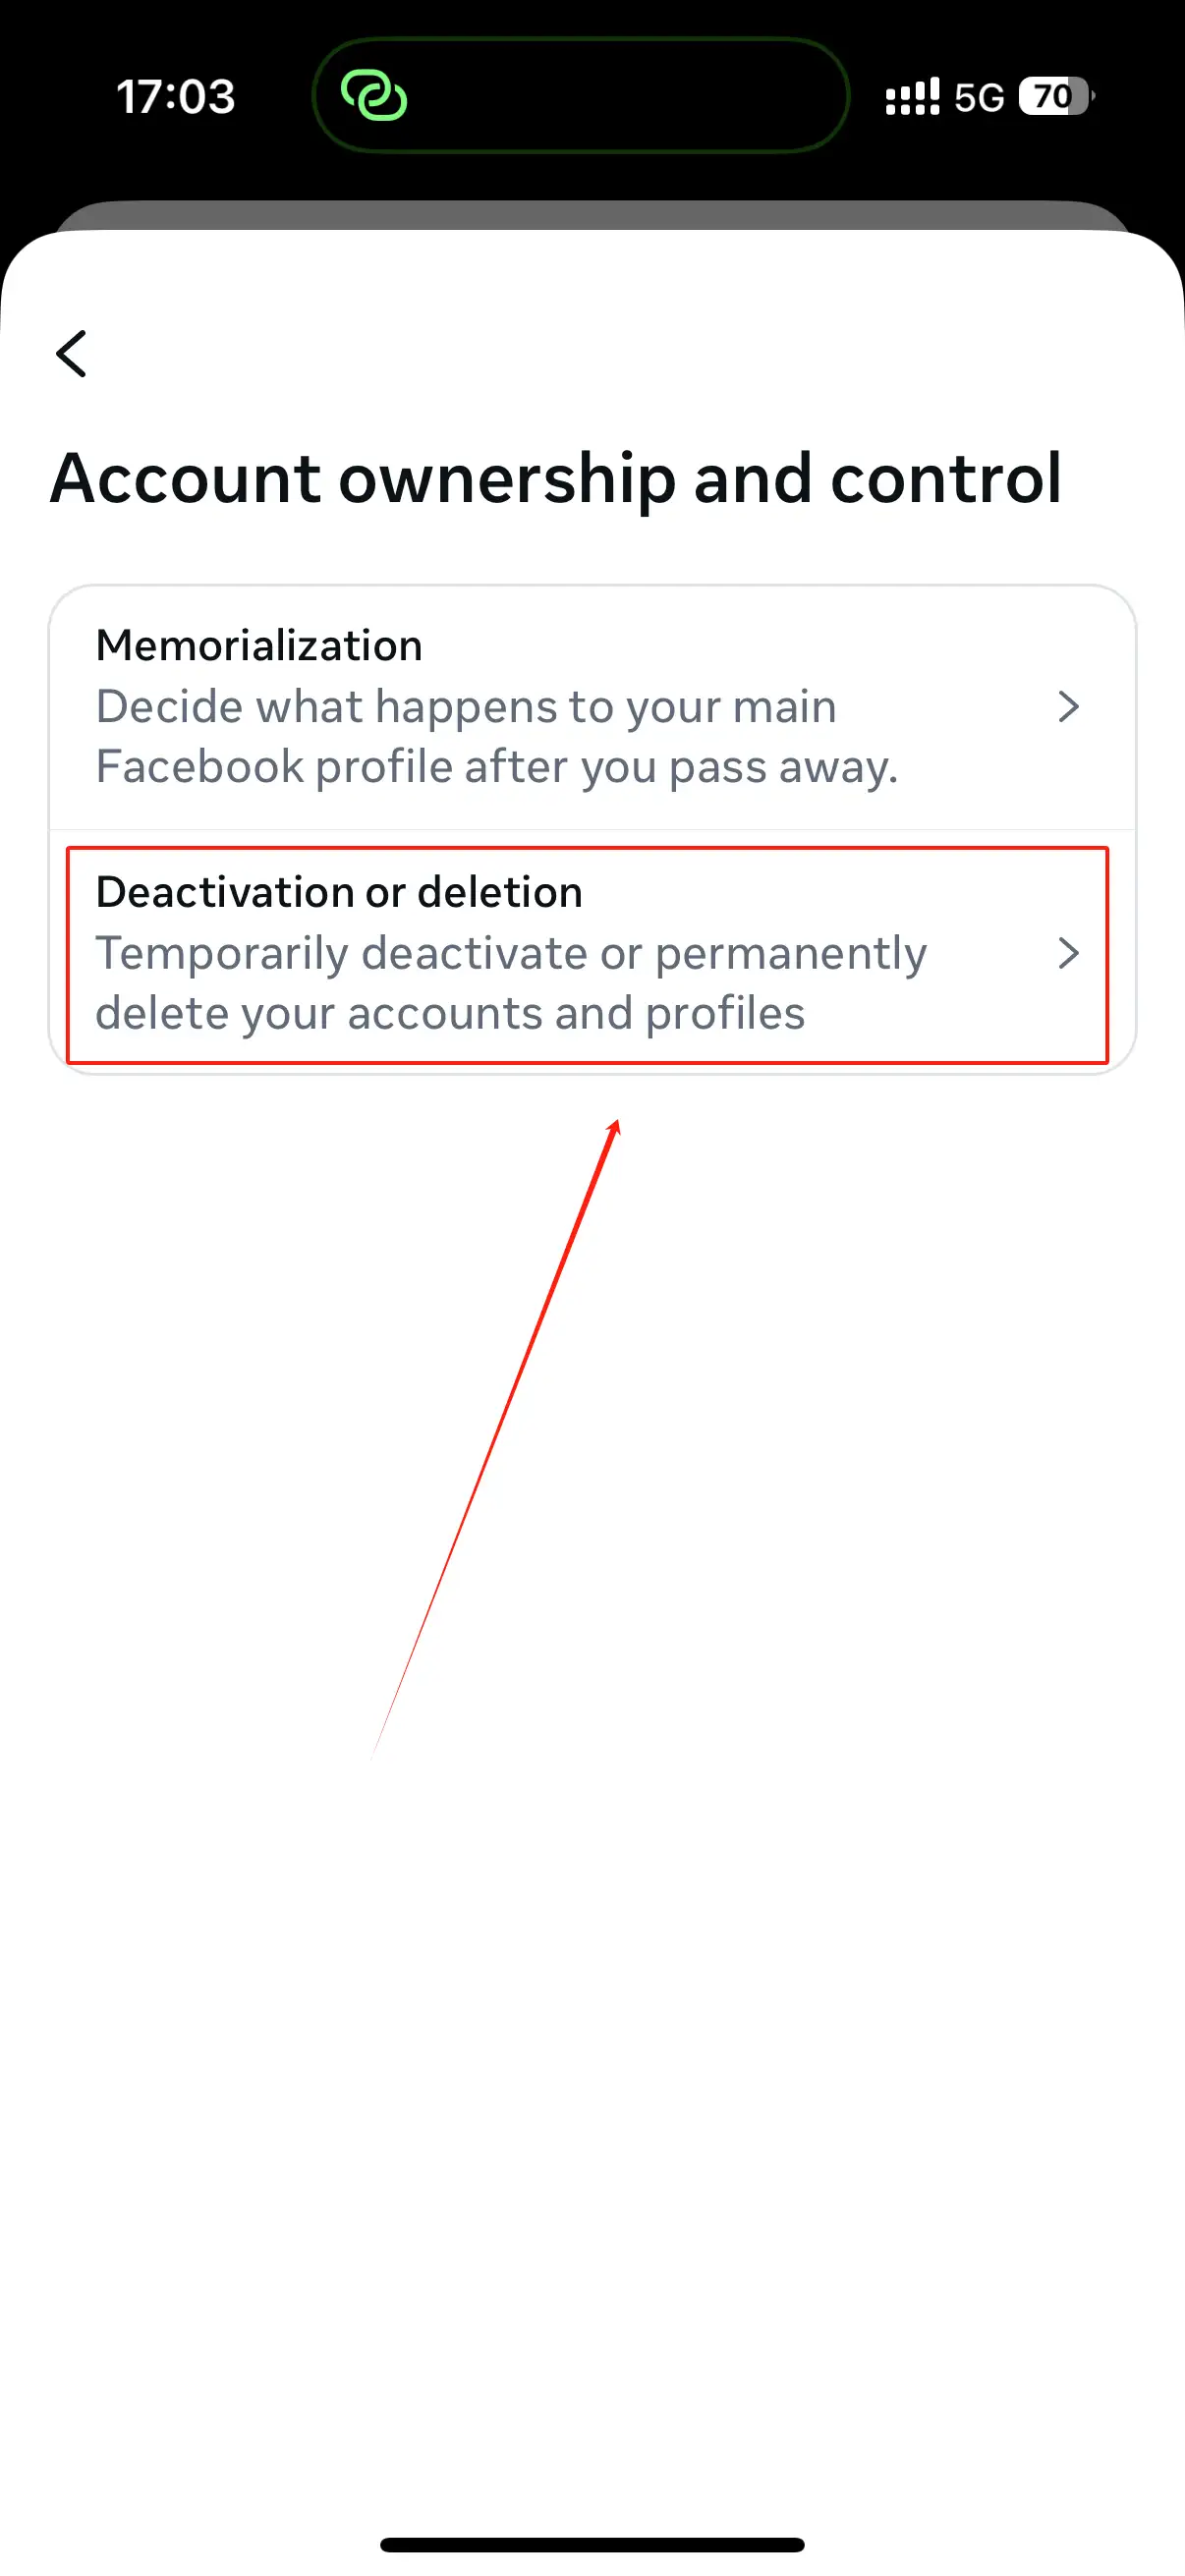
Step 3: Click on "Account Ownership and Control"
Click on the "Account Ownership and Control" option at the bottom.
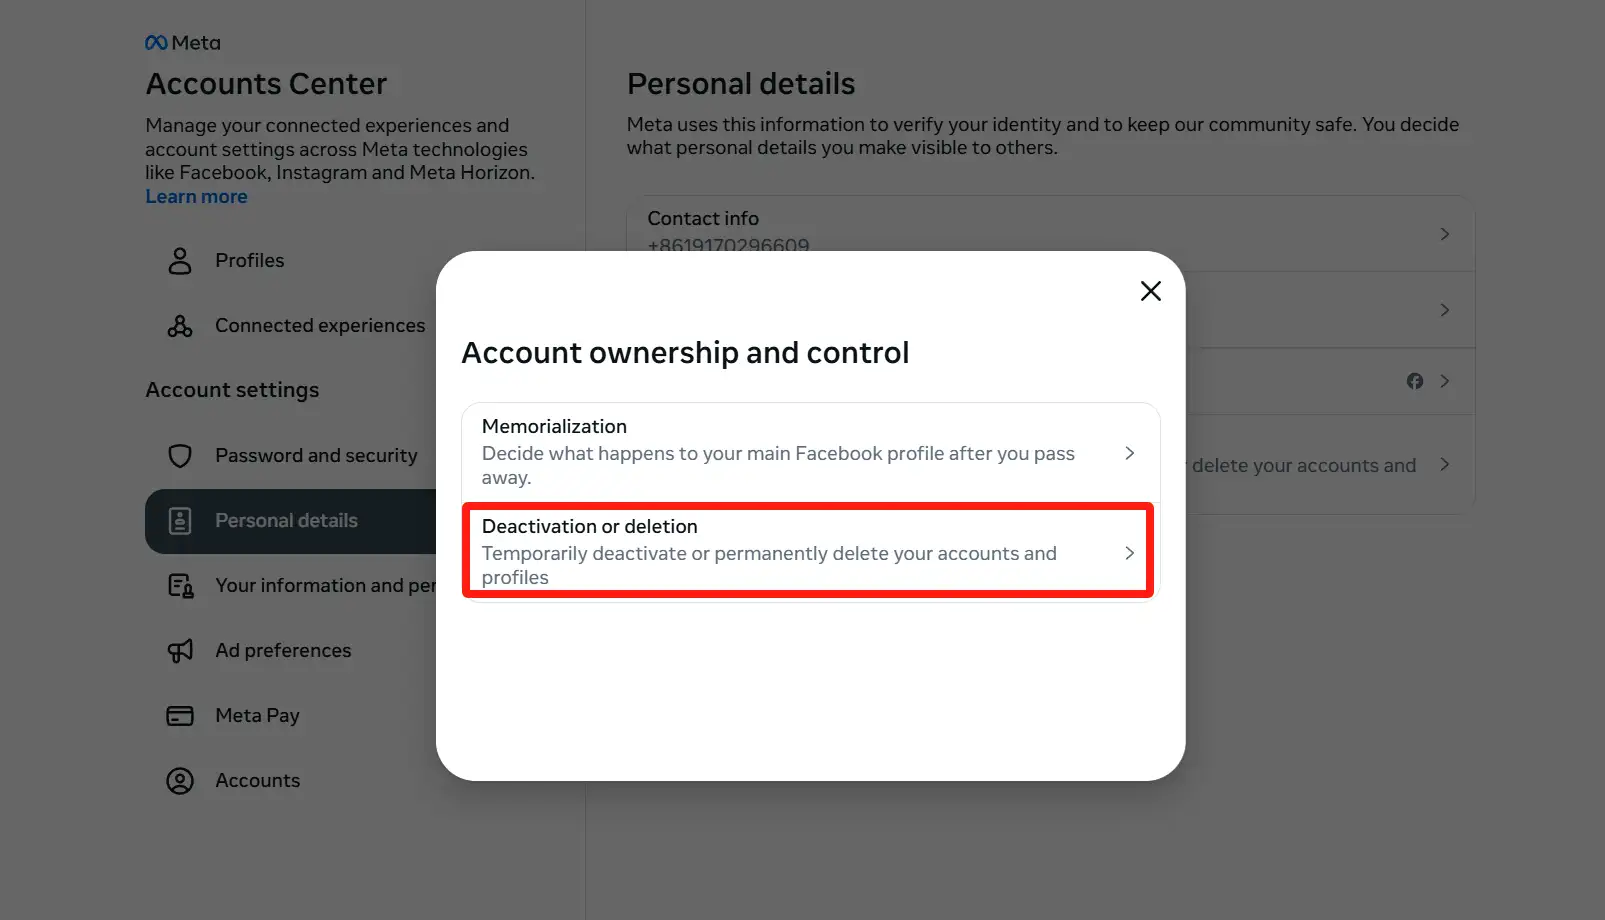
Step 4: Click on "Deactivate and Delete"
Click on the second option, "Deactivate and Delete".
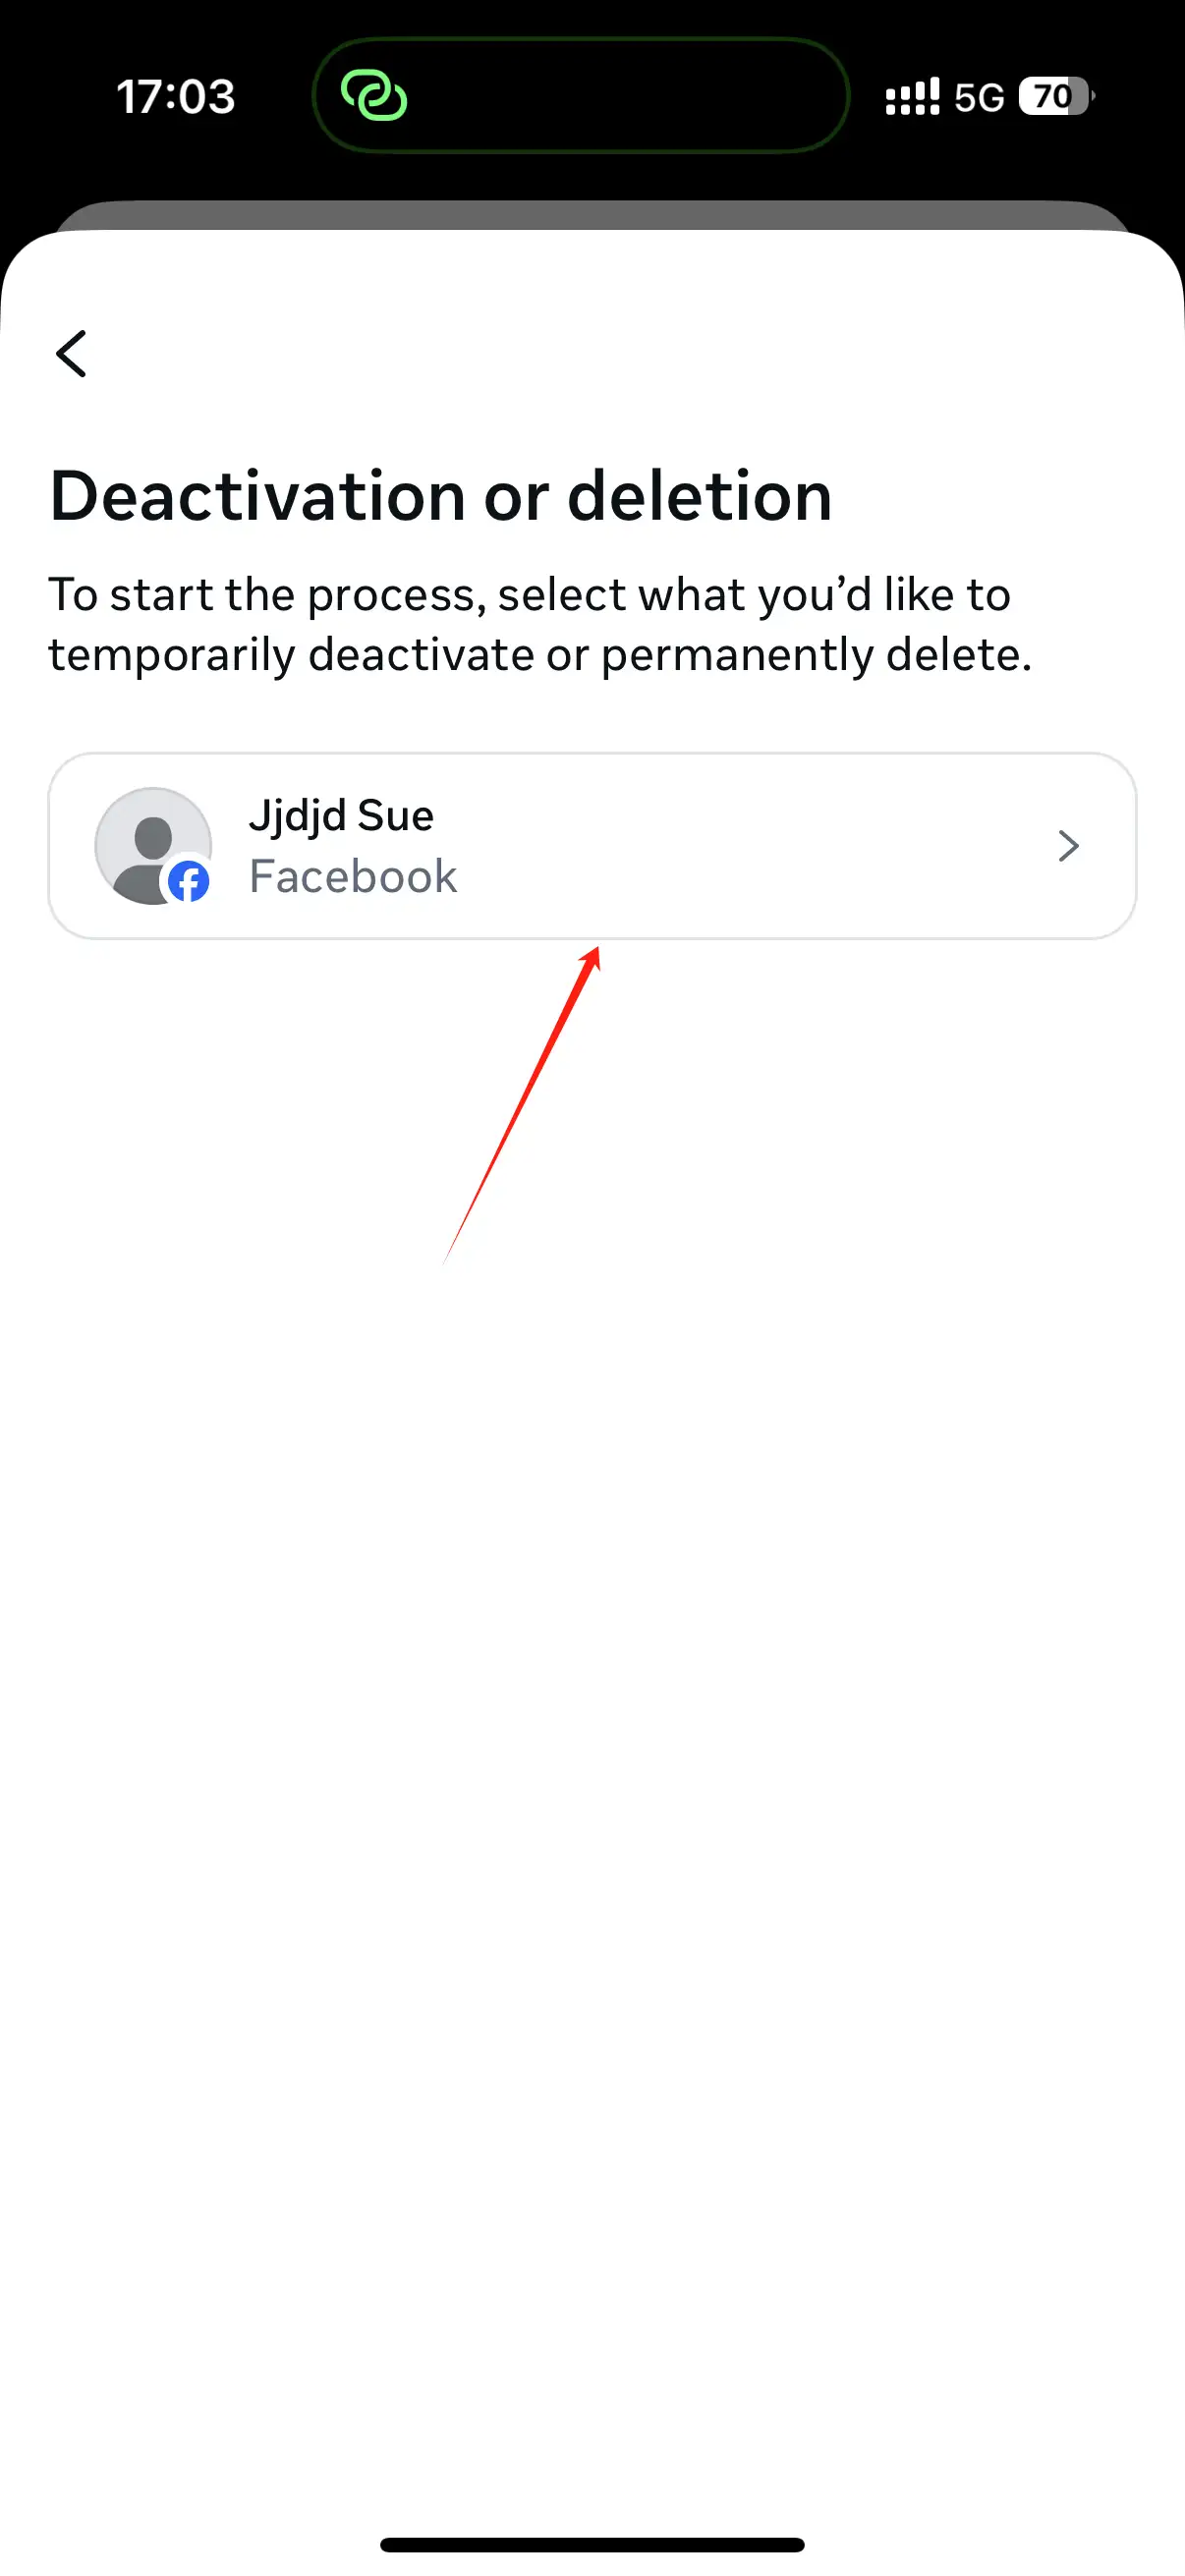
Step 5: Select the account you want to deactivate
Select the account you want to deactivate. If you have accounts with other Meta products (e.g., Instagram), you will also see those here.
You may not see this screen if you do not have multiple Meta accounts. If you only have one personal account, then just select your personal account.
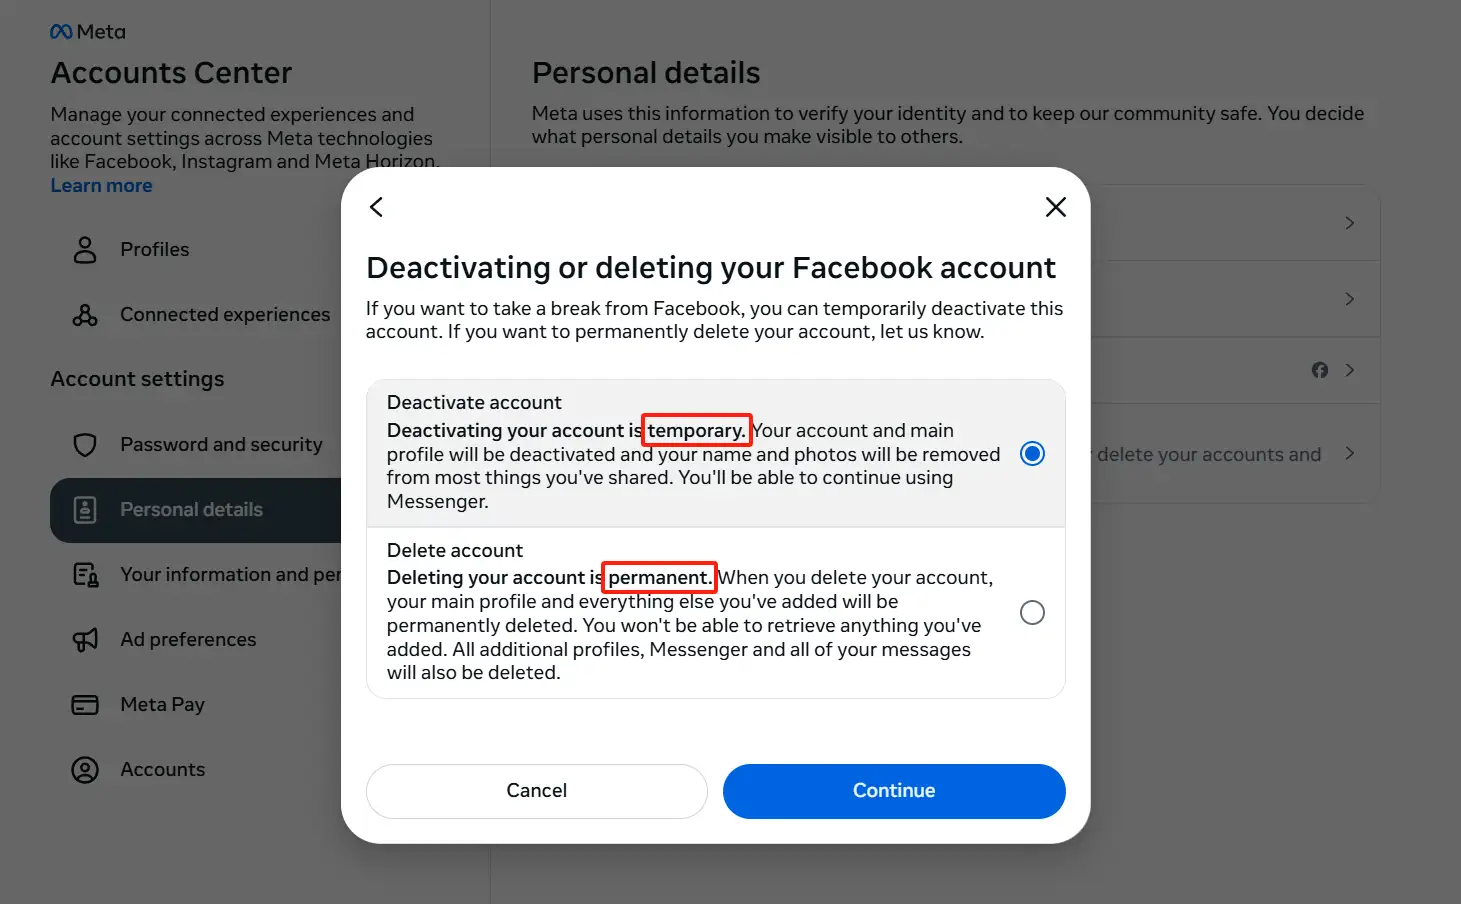
Step 6: Select "Deactivate Account"
Select "Deactivate Account". This option will preserve your account name and data in case you need to reactivate it. Click "Continue" to proceed to the next step.
If you want to permanently delete your account, select "Delete Account" here. Unlike deactivation, this action is permanent.
Deactivating your Facebook account does not deactivate Facebook Messenger.

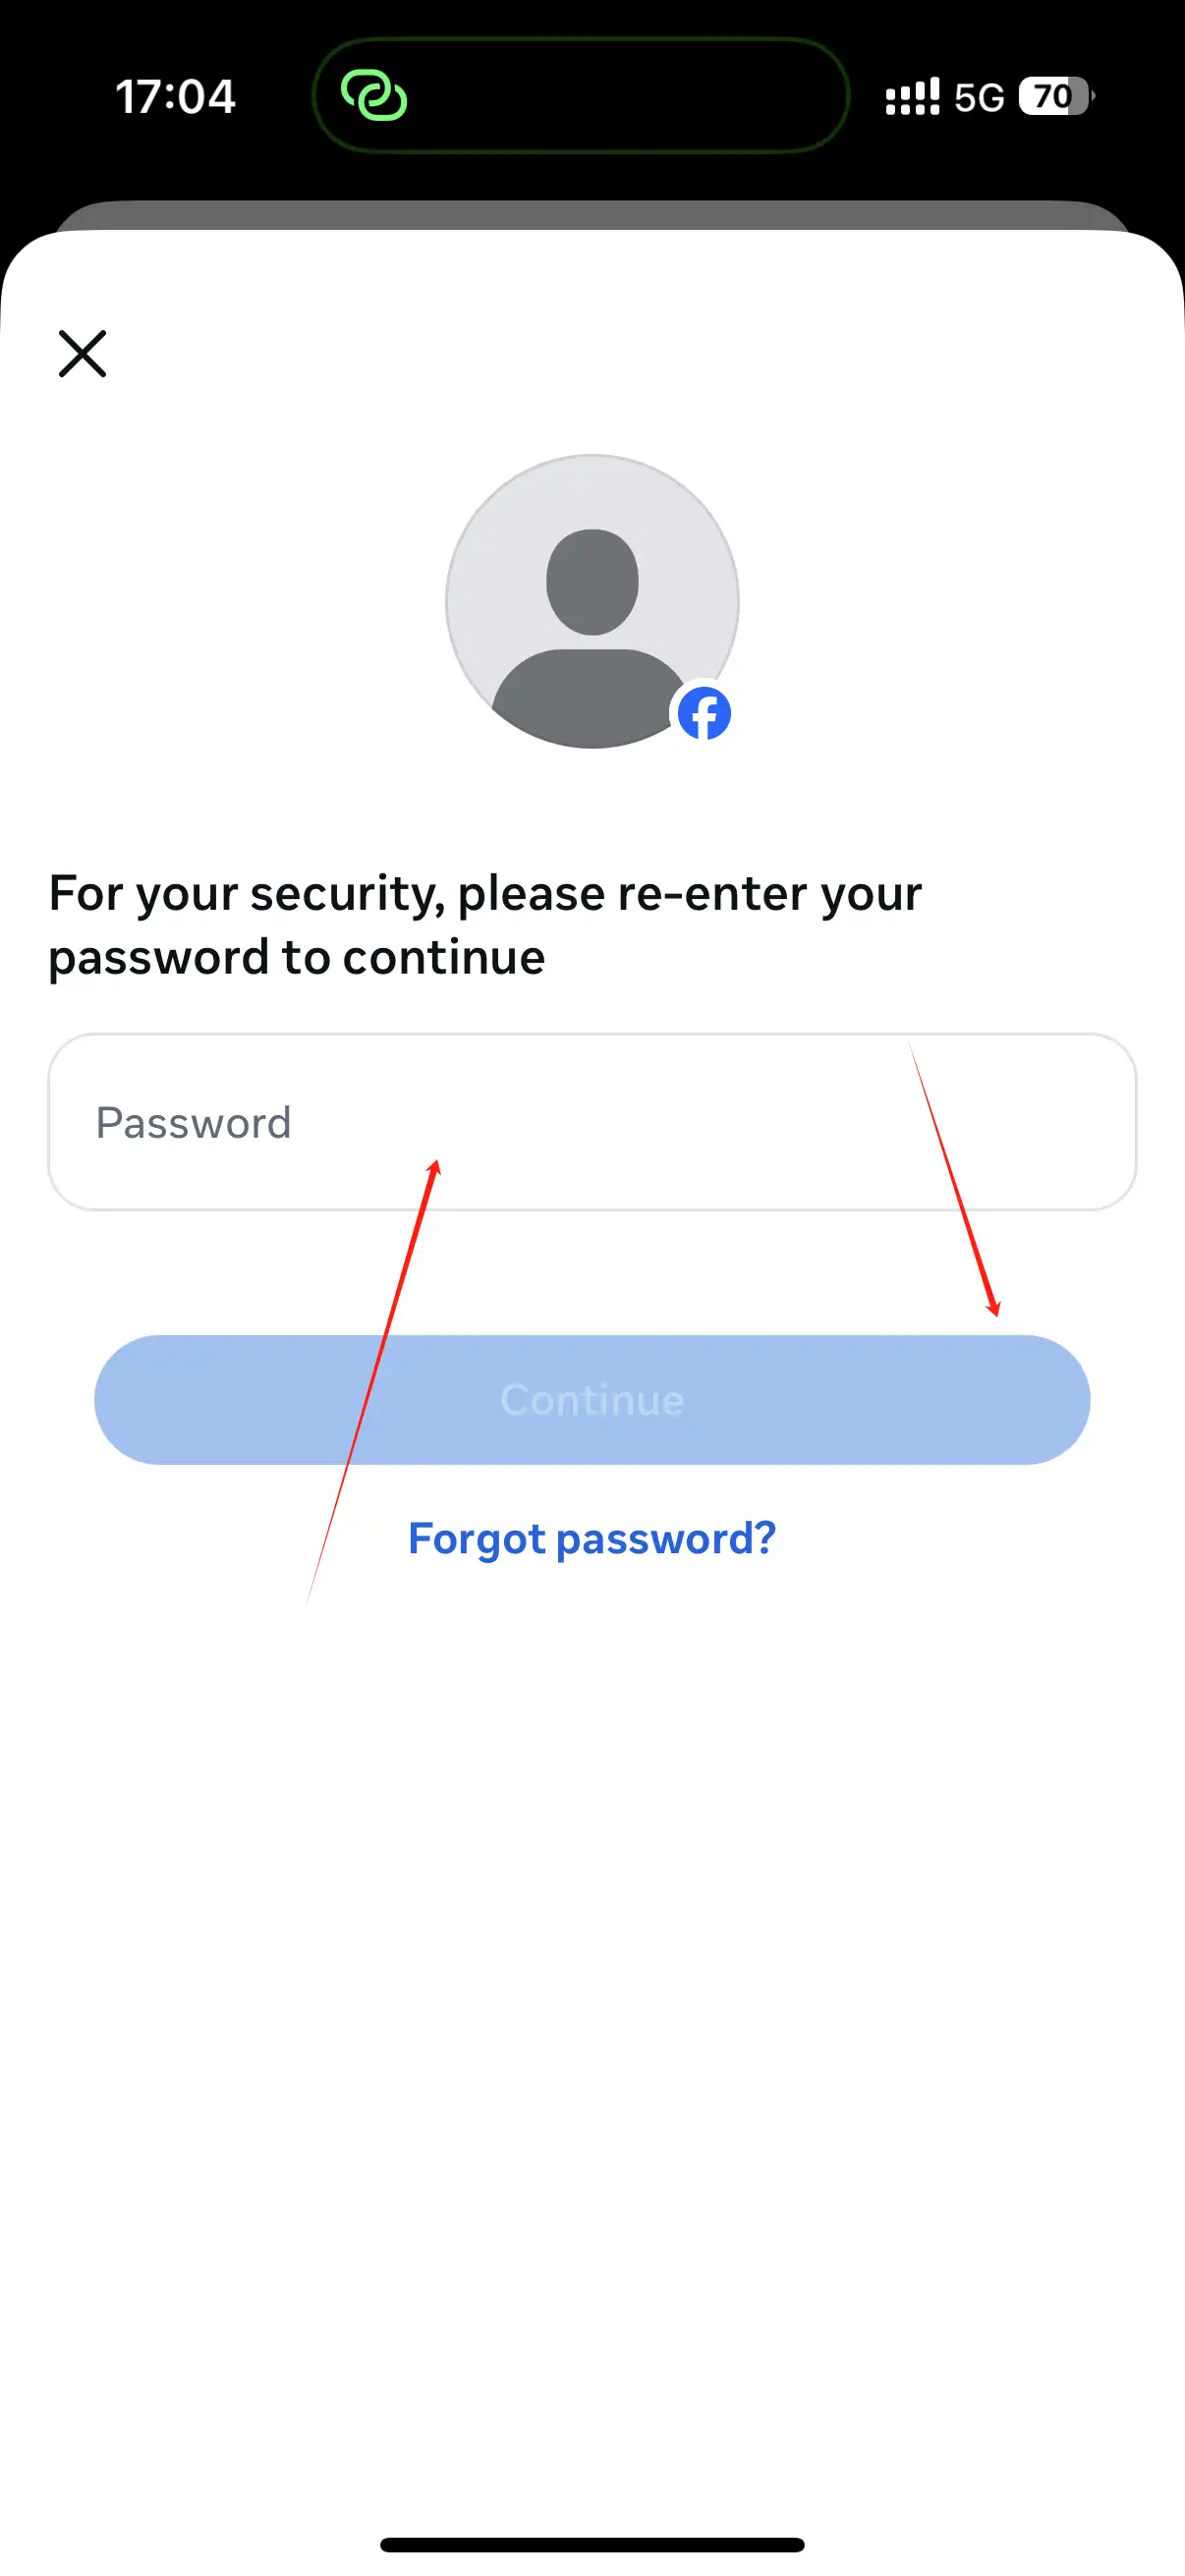
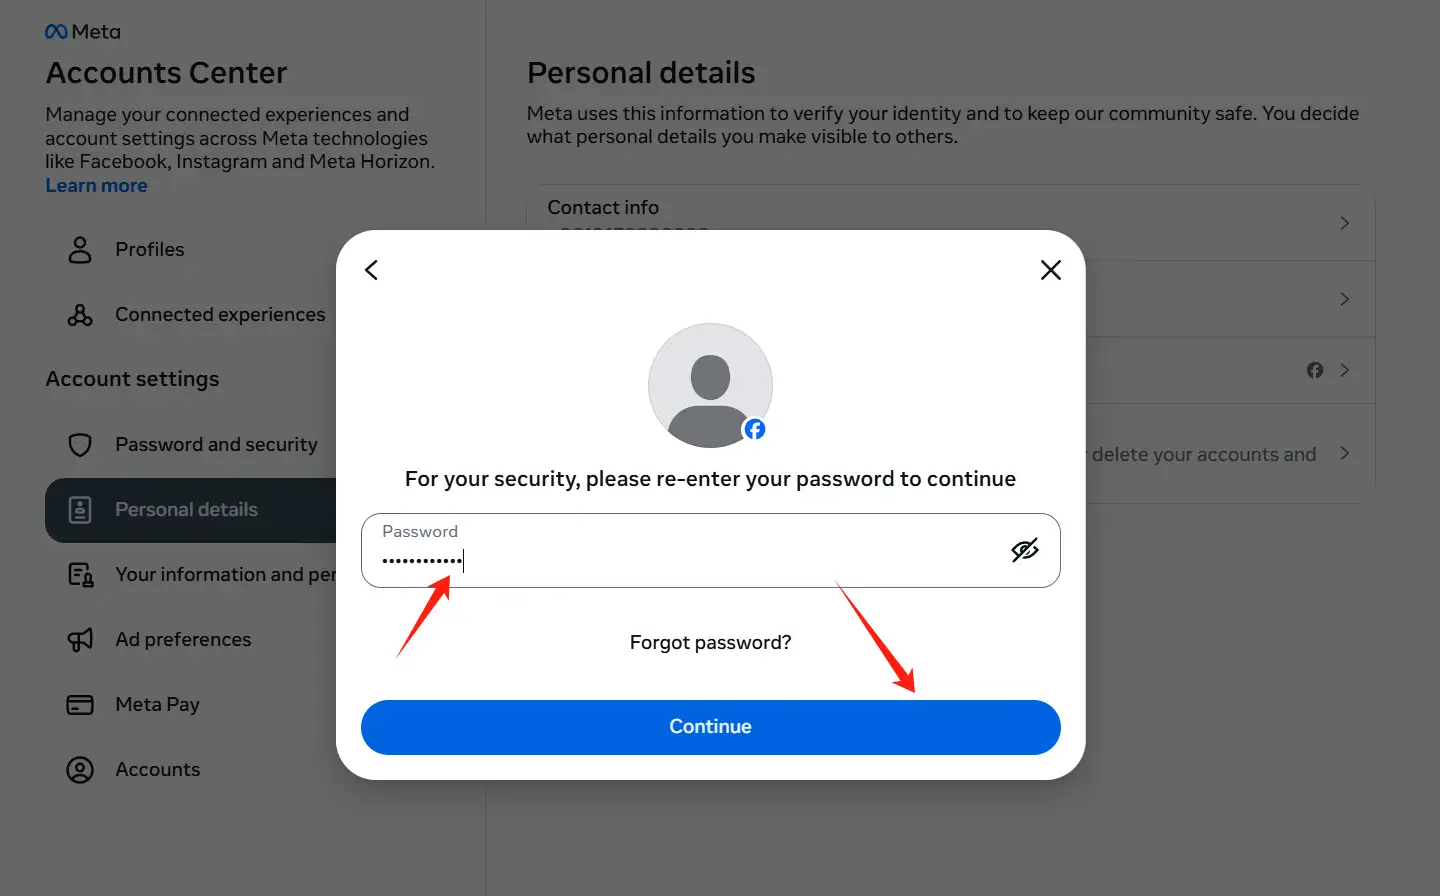
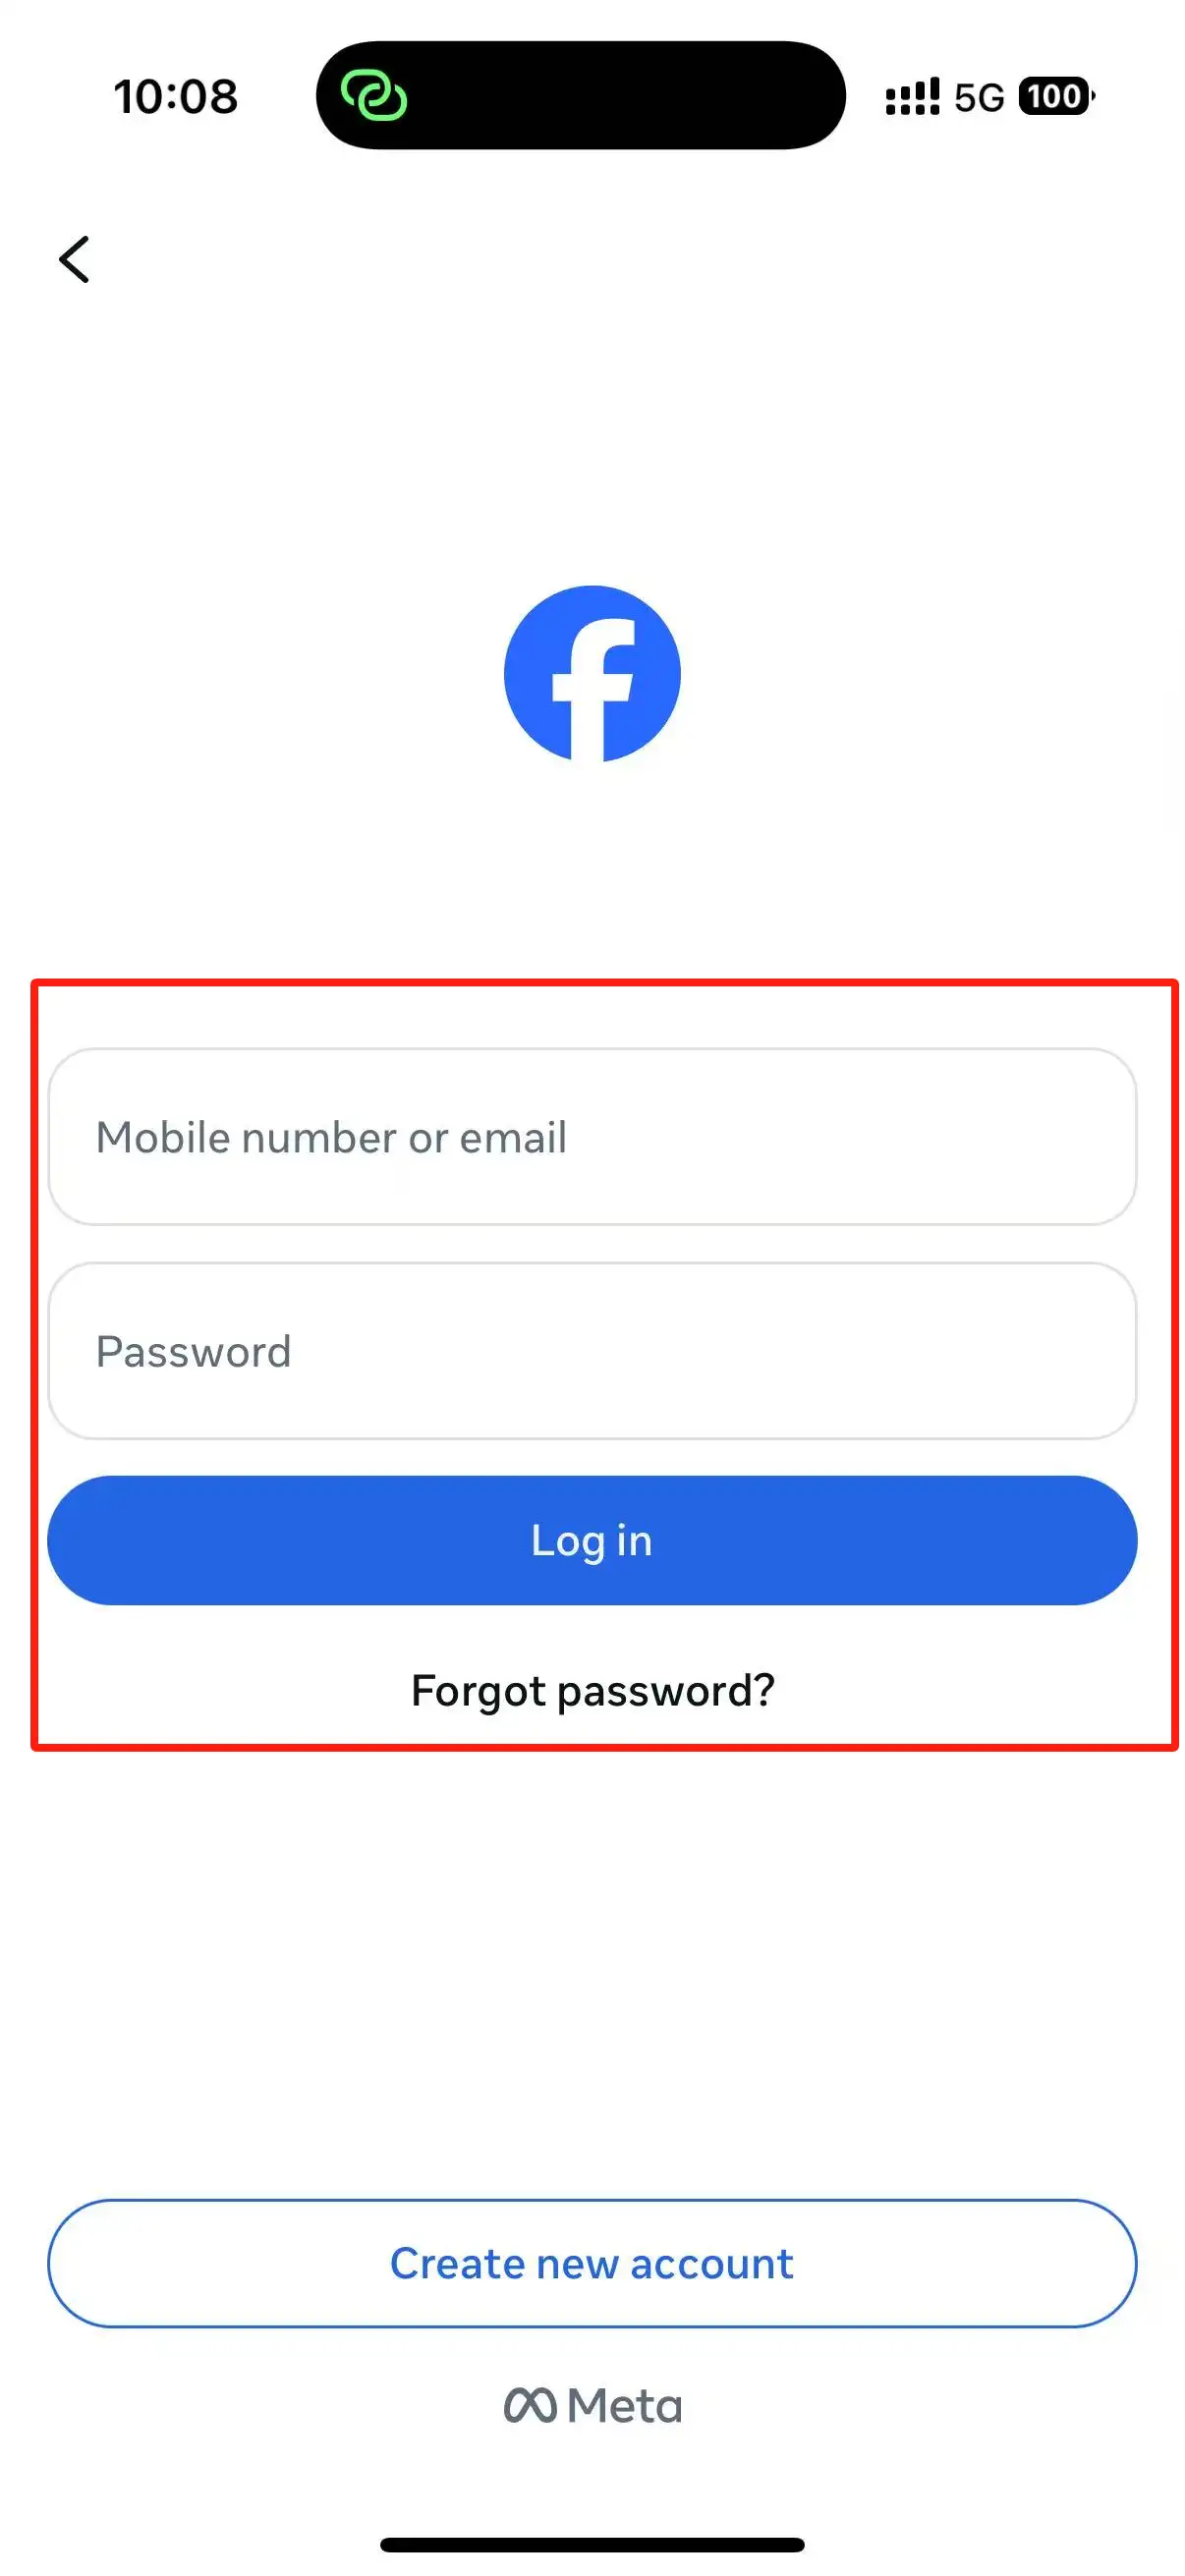
Step 7: Enter your Facebook password and click "Continue"
Enter your Facebook password and click "Continue". This will confirm that you are the owner of the account.
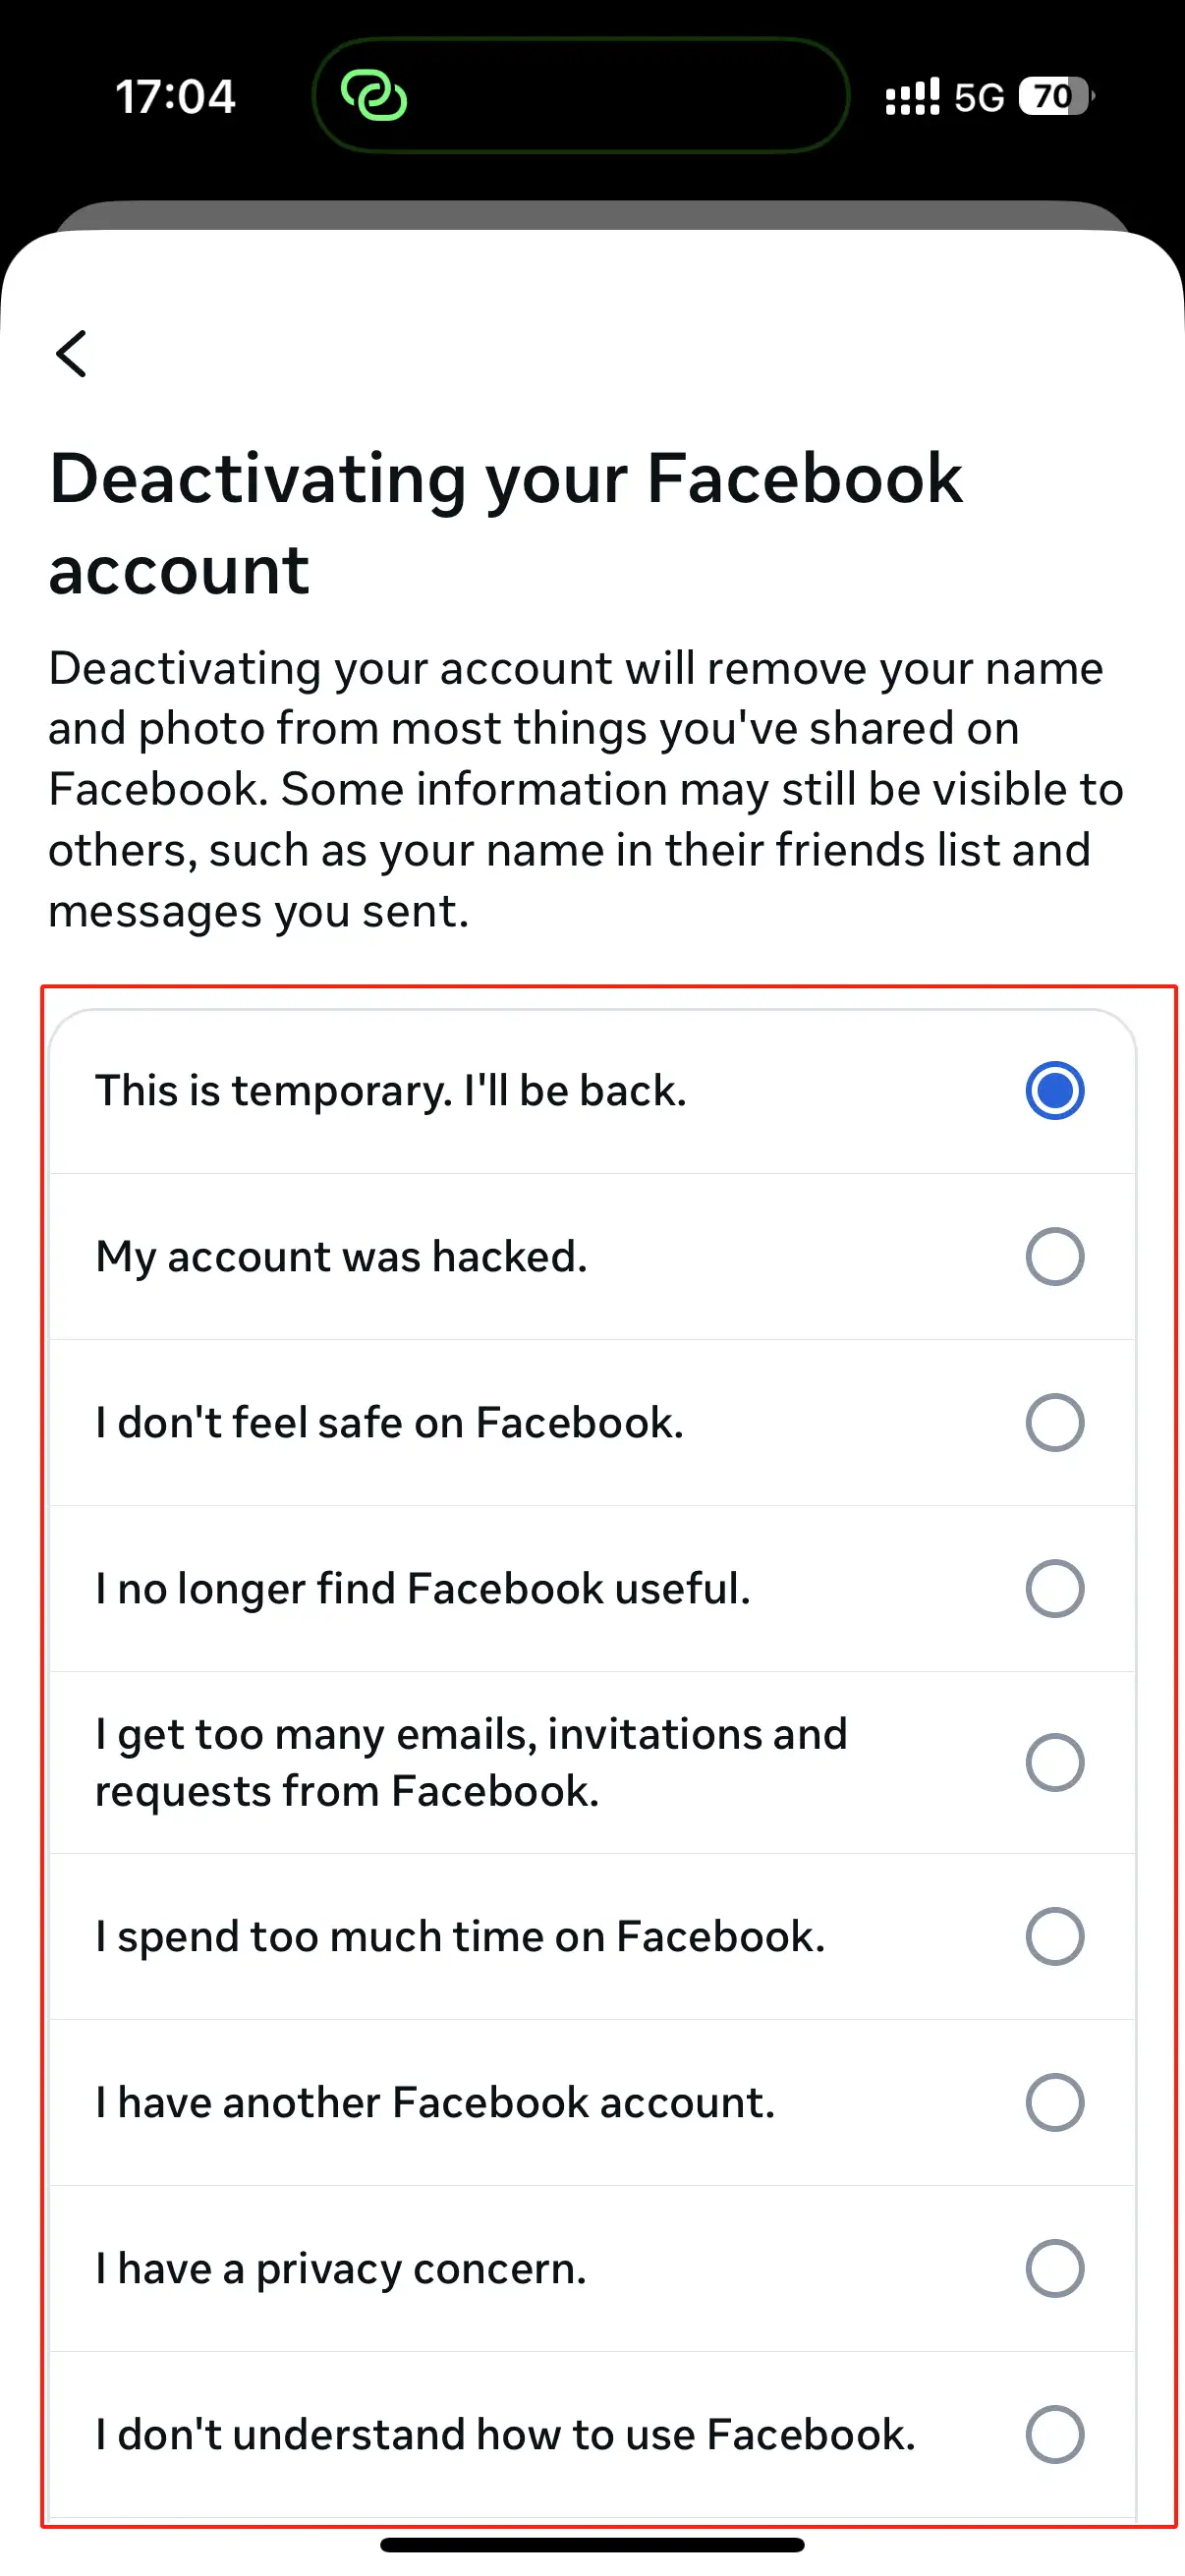
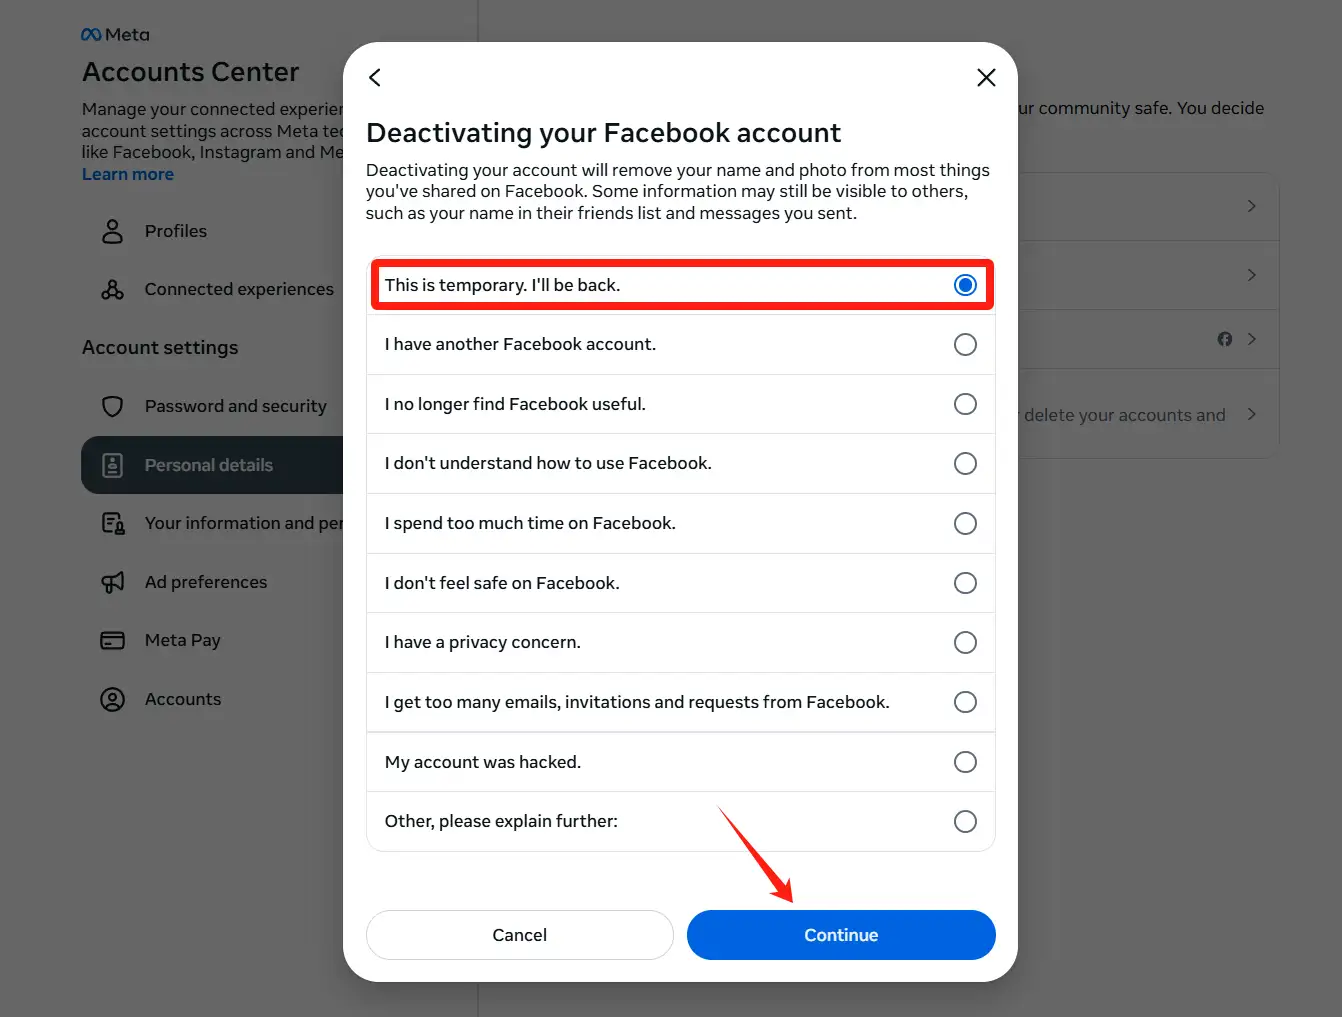
Step 8 : Select the reason you want to deactivate and click "Continue"
Select the reason you want to deactivate and click "Continue". This is only for Facebook's own records. If you come back later, just select "This is temporary, I'll be back".
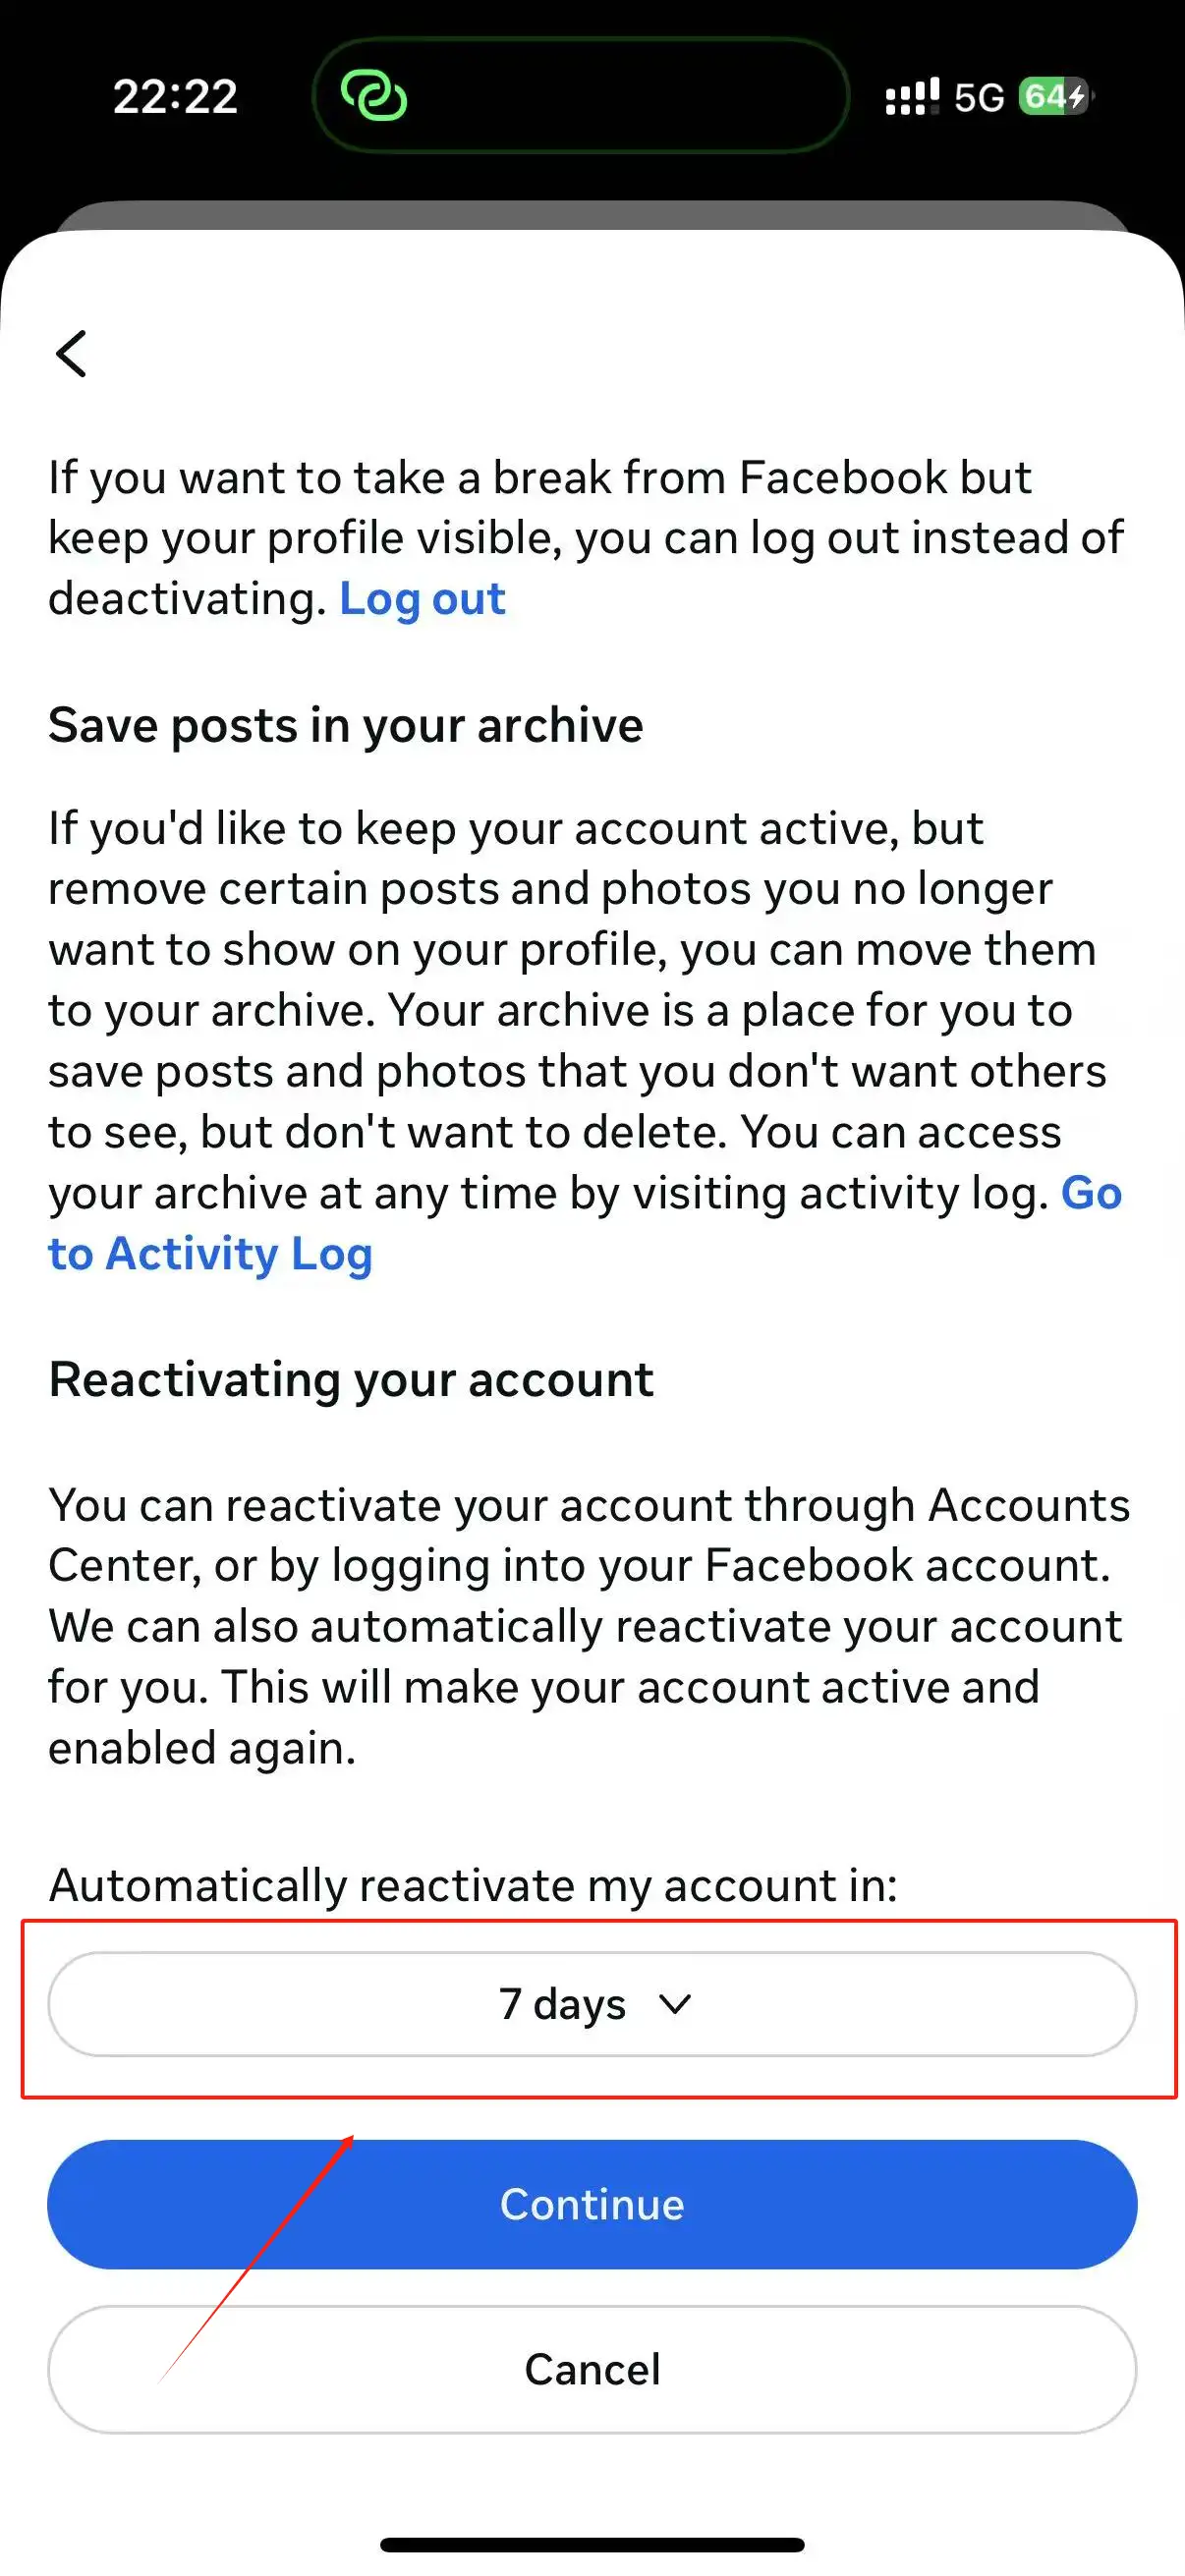
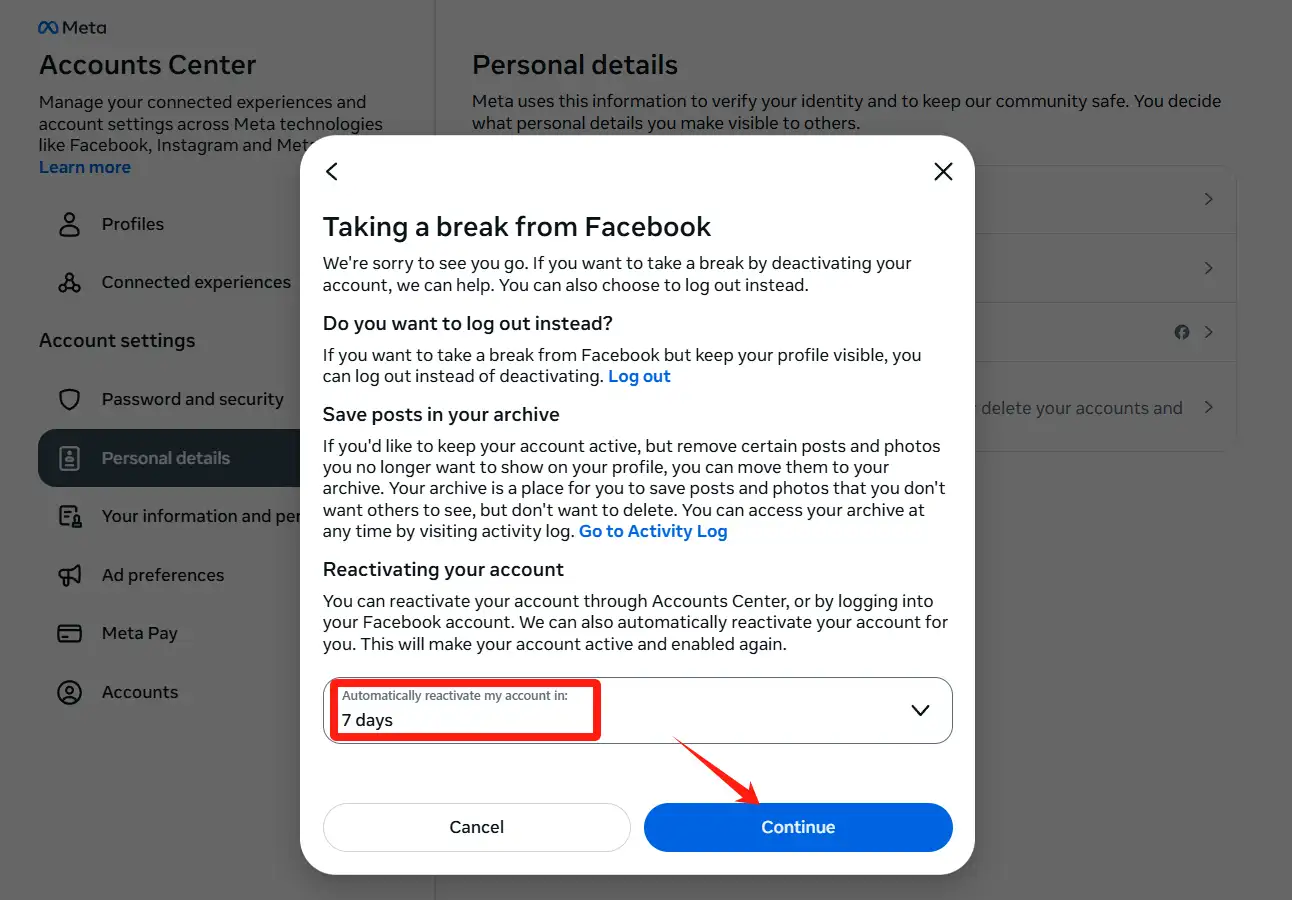
Step 9: Choose when to reactivate your previous account
Choose when to reactivate your previous account. If you still want to deactivate, scroll down to the bottom of the page and select the time you want Facebook to automatically reactivate your account (1-7 days are optional). If you want to log in and reactivate yourself when needed, select "Don't reactivate automatically" from the menu.
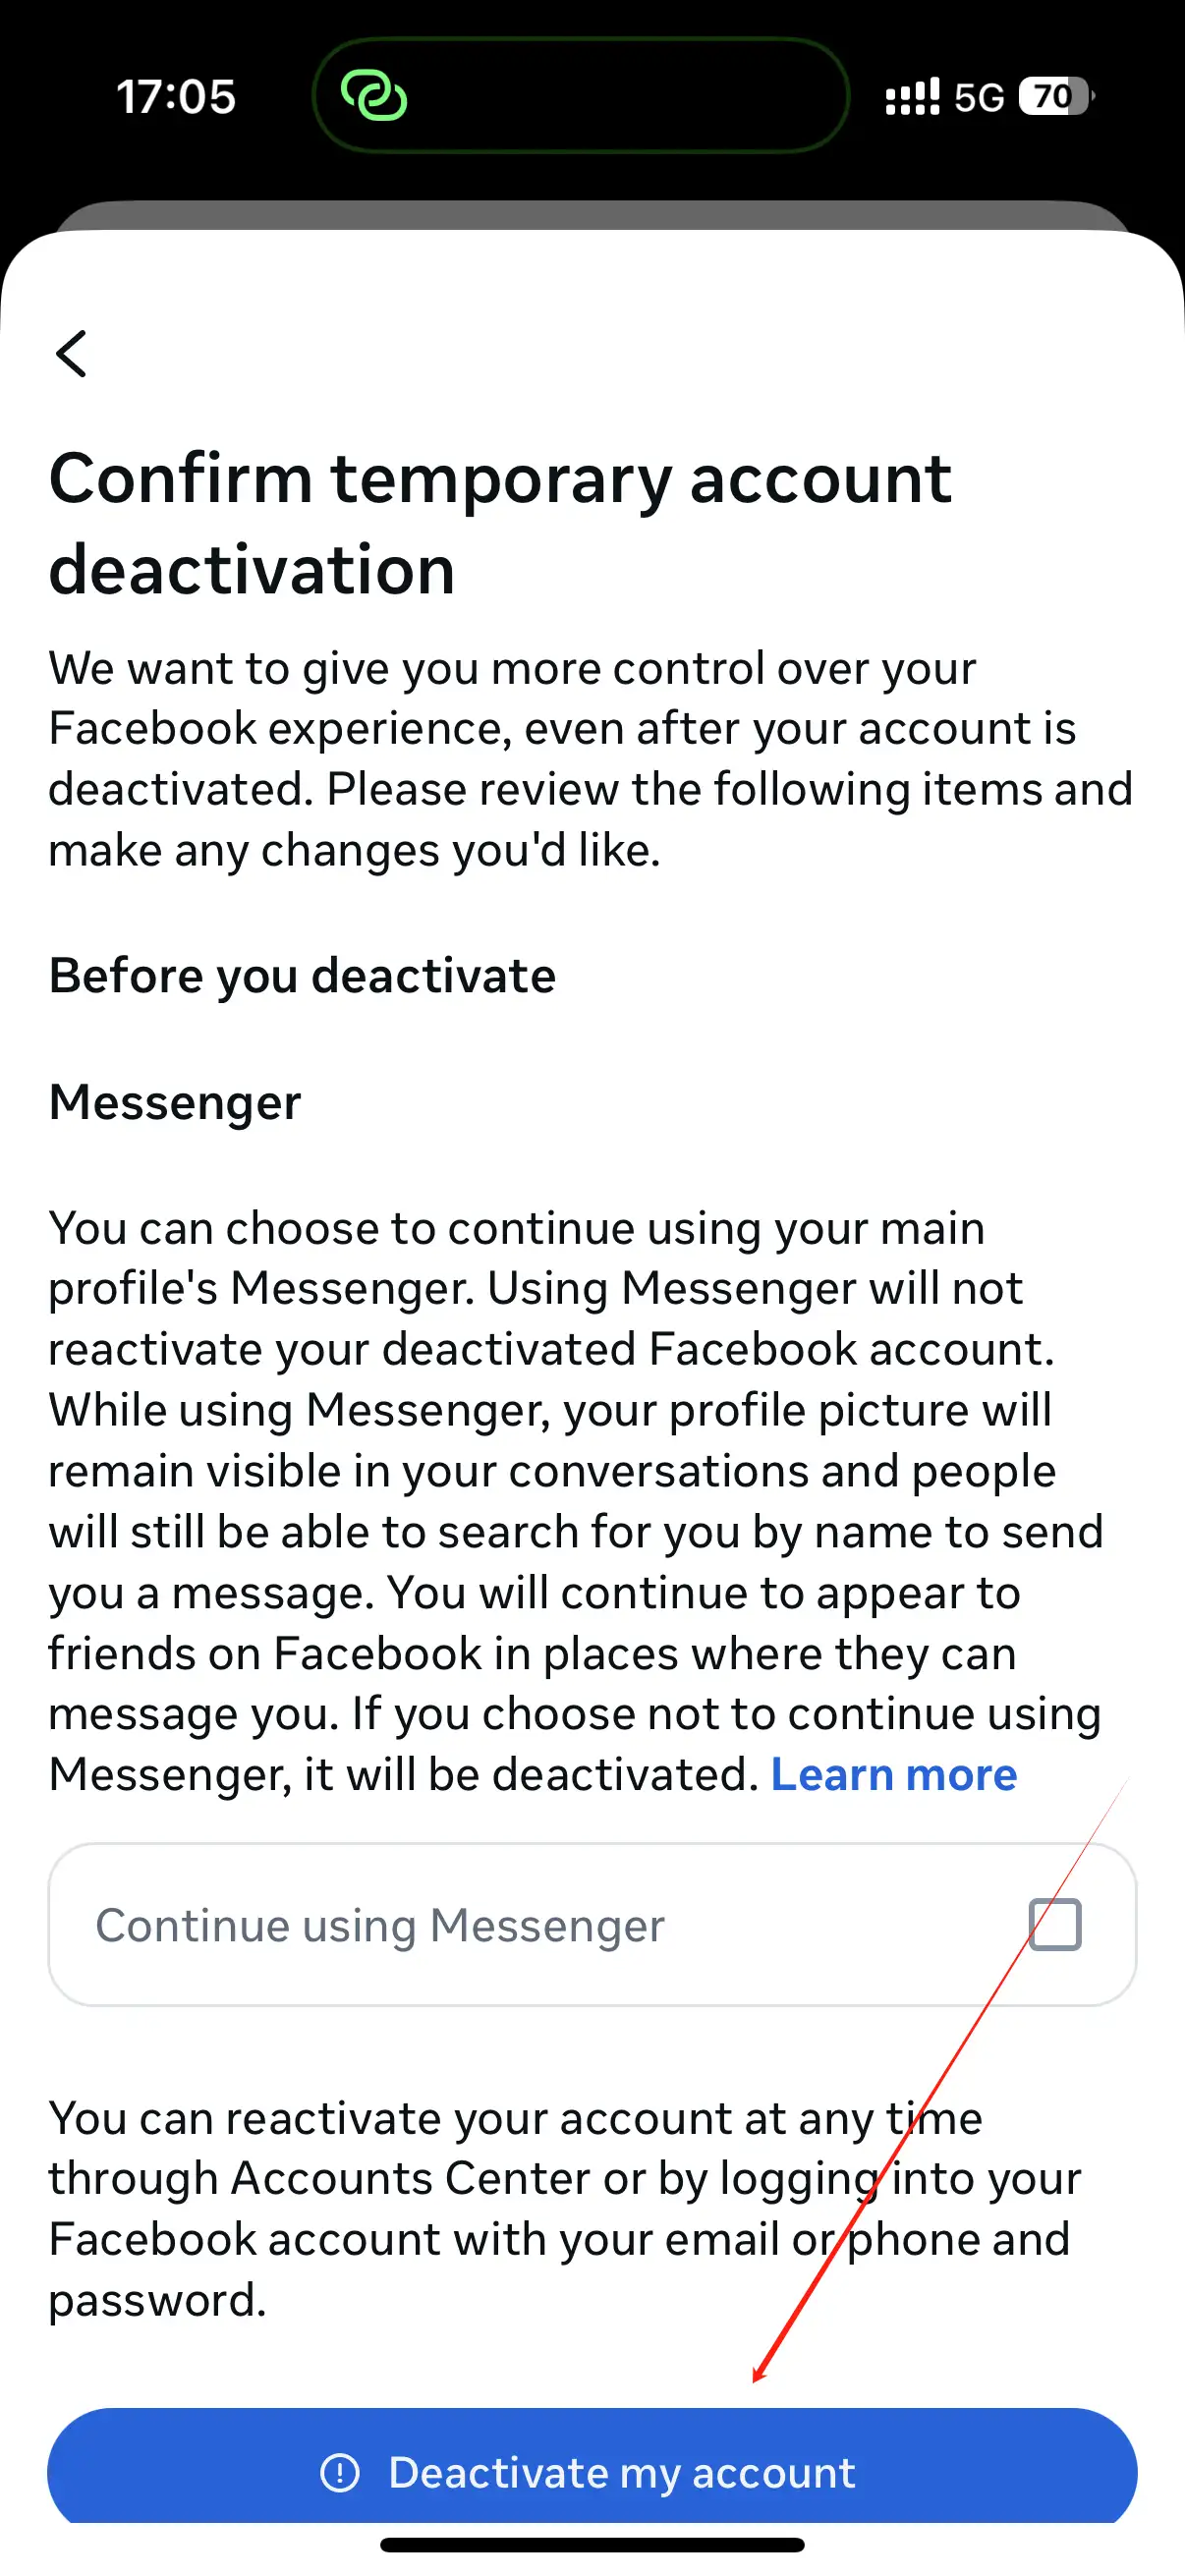
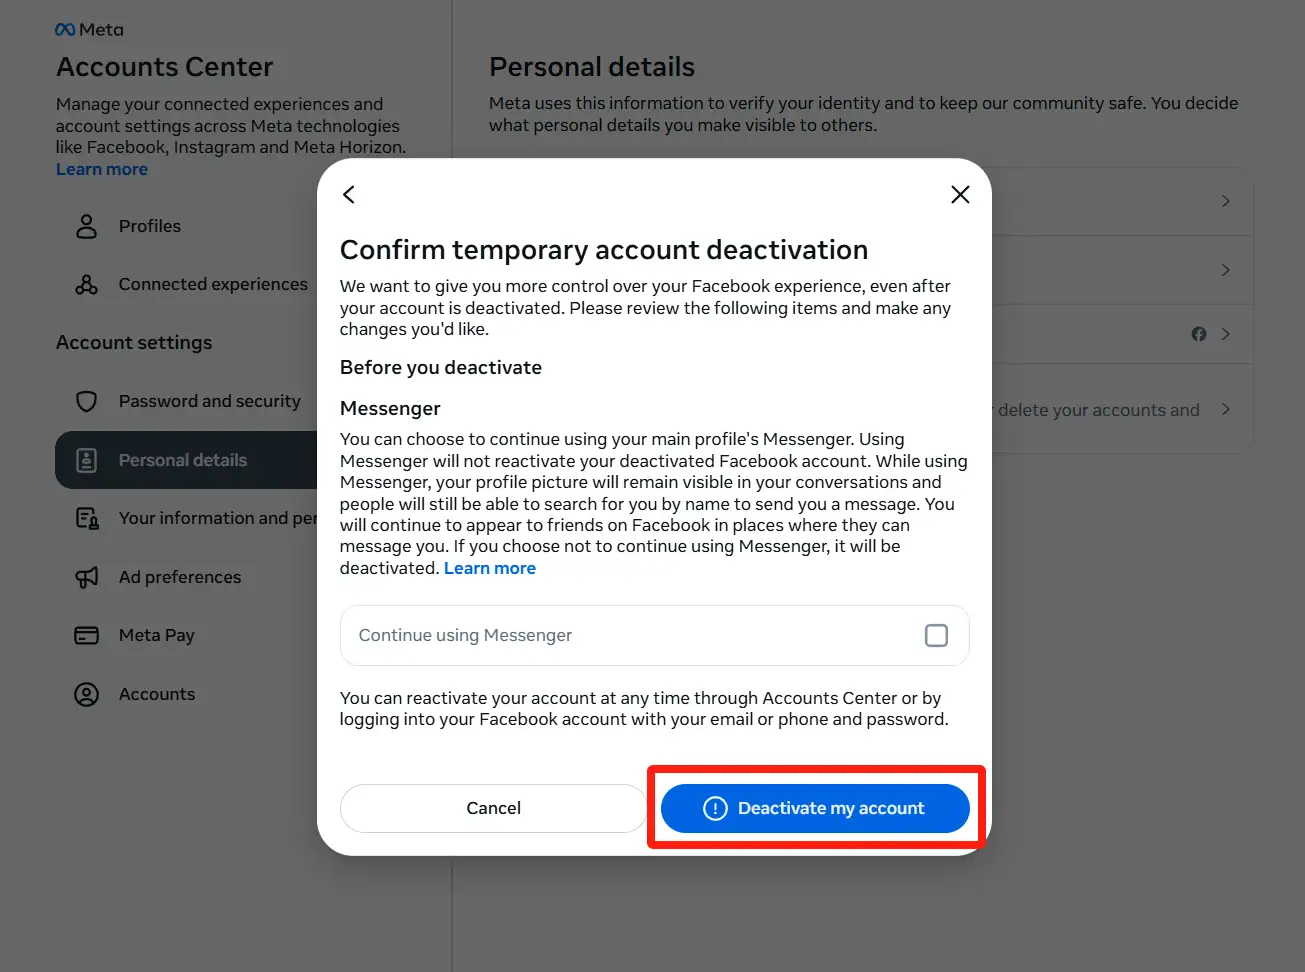
Step 10: Click the blue "Deactivate My Account" button
Click the blue "Deactivate My Account" button. This will deactivate your account and log you out of Facebook. But you can log back in the next time you open the Facebook app to reactivate your account.
Deactivate on the desktop (Account Center)
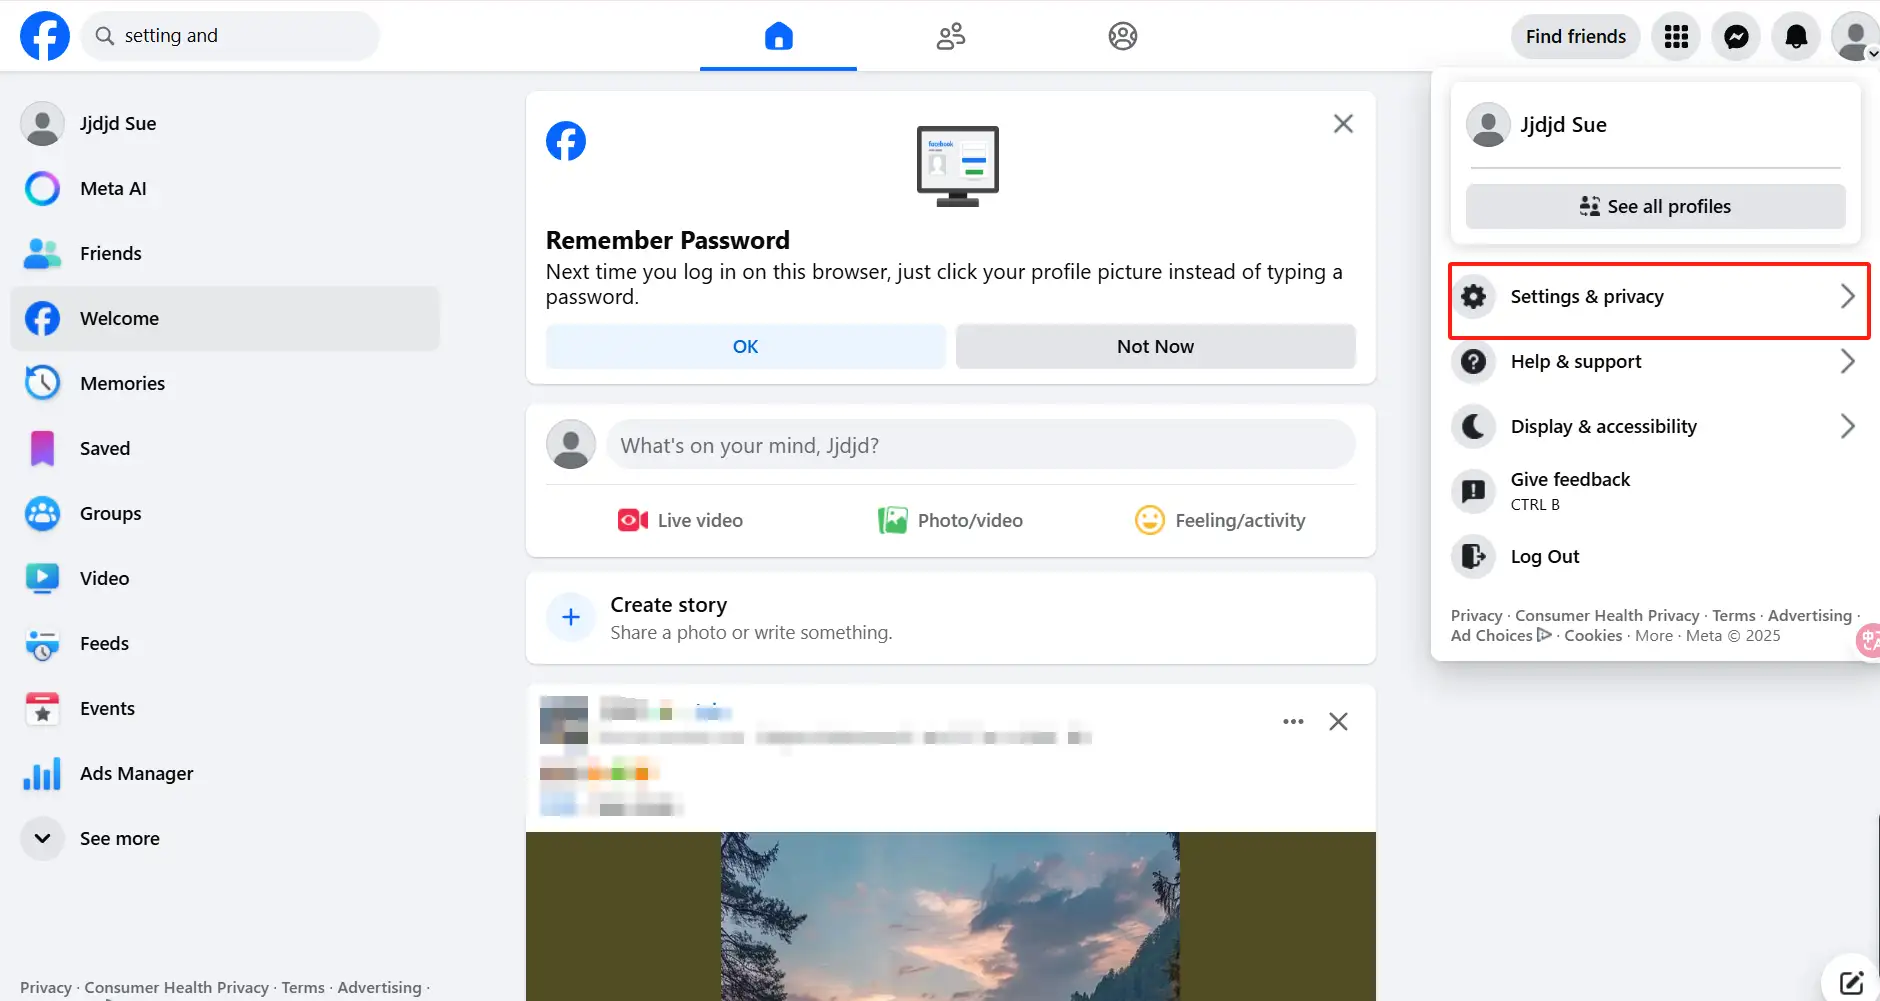
Step 1: On the "Personal Homepage", find "Settings"
On the "Personal Homepage", find "Settings". Click the person icon in the upper right corner to find it, and select the first "Settings and Privacy".
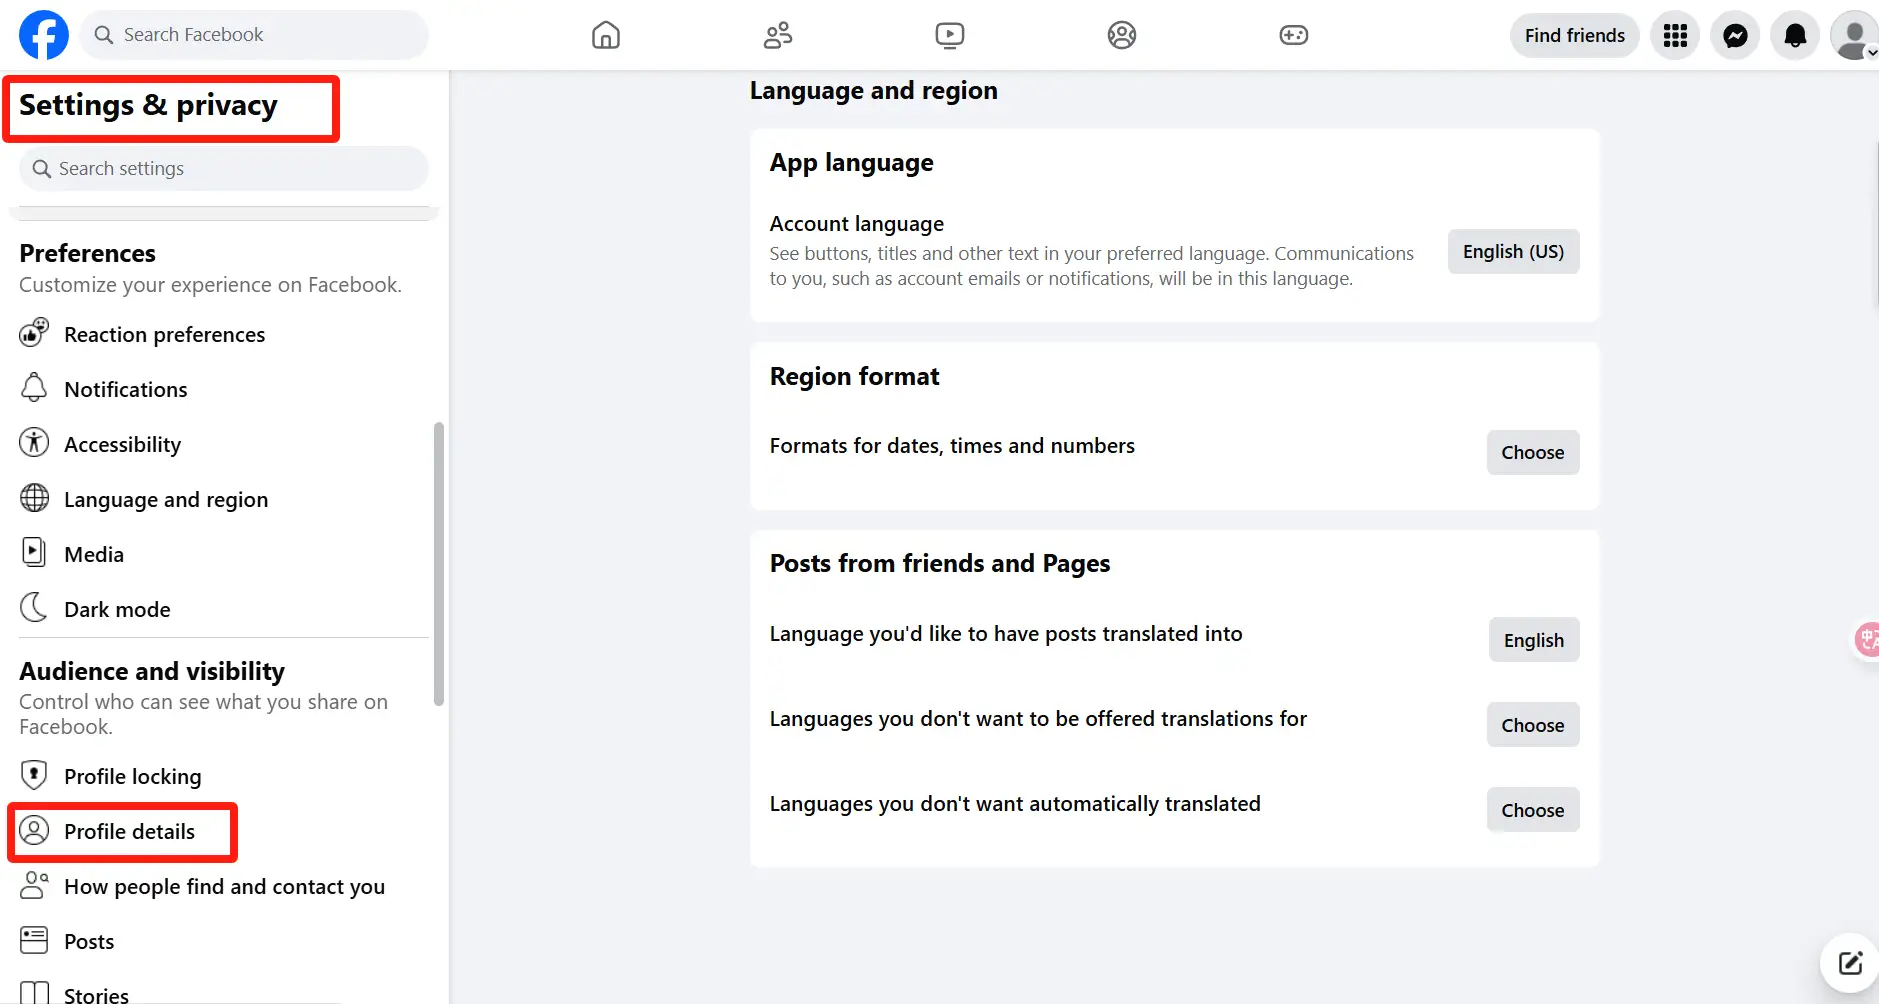
On the "Personal Homepage", find "Settings"Step 2: Click "Personal Information”
Click "Personal Information." This option is under the "Account Settings" heading, just scroll down to find the option with a human badge icon.
Step 3: Tap "Account ownership and control"
Tap "Account ownership and control." It's the last option in the "Personal information" settings menu.
Step 4: Click on "Deactivate and Delete"
Click on the second option "Deactivate and Delete".
Step 5: Select the account you want to deactivate
Select the account you want to deactivate. If you have accounts with other Meta products (such as Instagram), you will also see those accounts here.
If you do not have multiple Meta accounts, you may not see multiple accounts, so just select the Facebook account you want to deactivate.

Step 6: Select "Deactivate Account"
Select "Temporarily deactivate account." This option will keep your account name and data in case you need to reactivate it in the future. Click "Continue" to proceed to the next step. If you want to permanently delete your account, you can select "Delete Account" here, which is the second option. This action is different from temporarily deactivating, and is permanent.
Tip: Deactivating your Facebook account does not deactivate Facebook Messenger.
Step 7: Enter your Facebook password and click "Continue"
You need to enter your Facebook password in this step and click "Continue". This step is to confirm whether you are the holder of the account.
Step 8: Select the reason you want to deactivate and click "Continue"
Select the reason you want to deactivate and click "Continue". If you come back later, just select "This is only temporary, I'll be back". The specific reason will not be disclosed, this is just to allow Facebook to make subsequent optimizations and improvements.
Step 9: Choose when to reactivate your account
If you still want to deactivate, you can choose when Facebook will automatically reactivate your account. (You can choose from 1 to 7 days) If you want to reactivate your account by logging in again when needed, select "Don't reactivate automatically" from the menu.
Step 10:Click the blue "Deactivate My Account" button
Click the blue "Deactivate My Account" button. This will deactivate your account and log you out of Facebook. You can reactivate your account by logging back into Facebook the next time you open the site.
What happens when you deactivate your Facebook account?
Deactivating Facebookmeans redefining your Facebook account. When you submit a deactivation request, the platform triggers a complex privacy agreement: your profile, photos, and posts will disappear from all your friends' dynamics, as if they never existed.
However, this "invisibility" does not mean everything about you is gone. For example, other friends can still see the messages you send in the group chat, but your name will be displayed as "deactivated account". However, this display is often misleading to users, who will think that all their information has disappeared from Facebook.
Interestingly, Messenger's survival mode is a blind spot for many people. According to Facebook's official policy, when you deactivate your main account, Messenger will remain active by default unless you manually set how to deactivate Facebook and Messenger.
This "looming" state will bring some complex consequences: you can continue to chat with friends, but they can't view your profile by clicking on your homepage.
Another impact on the use of permissions by third-party applications is that when you log into a fitness or music platform using Facebook, deactivating the primary account does not automatically revoke your access. This means that Spotify may still read your public profile, and Instagram direct messages (despite using a Meta account) may continue to sync.
Some people also call this phenomenon "permission lingering." This can lead to a series of inconveniences. Suppose you want to solve this problem completely. In that case, you must manually revoke permissions for all associated apps before deactivating, which is in the guide on how to deactivate Facebook accounts permanently.
A warm reminder: Account deactivation essentially means that your account is dormant. It does not mean that you have no account, and you can restore all content on the platform immediately by simply logging back in later. The algorithm will continue to push the types of videos you liked before. For users looking to completely leave the account, permanently deleting the account in Meta's account center will trigger a 30-day "cooling off" period.
For users who manage brands or businesses, it is important to understand how to deactivate Facebook pages independently. After the primary account is deactivated, the associated pages will still be active, but the administrator must manage them through other accounts or reactivate the profile.
This “master-slave separation” protects business assets, but also increases the complexity of their operations. A small e-commerce owner shared a case: because they failed to transfer the page administrator role before deactivating an individual account, they were unable to handle customer inquiries, resulting in a 15% loss in quarterly revenue.
How to Reactivate Your Facebook Account
Step 1: Open Facebook (both mobile and desktop)
You can use a web browser or open Facebook on your phone.
Step 2: Enter your password to log in
You can log in using your email/phone number or password.
Step 3: Confirm reactivation
If prompted to reactivate, follow the on-screen instructions to complete the process.
Step 4: Access your profile
Once reactivated, your profile, posts, and content will be visible again and will not change.
Other privacy notes you should be aware of
If you deactivate Facebook for privacy reasons, you should know the following information:
-
Review privacy settings: Configure privacy settings to prevent data sharing.
-
Download all your previous data: Before deactivatingFacebook, save a copy of your Facebook information.
-
Disconnect third-party apps: This will delete your Facebook login information for other apps.
-
Change your contact information: Make sure you have other ways to contact you besides Facebook.
Conclusion
Mastering how to deactivate Facebook allows you to regain control over your account, whether you want to deactivate it or temporarily stop using it. By following the tensteps introduced above, from navigating the account center to managing how to disable Facebook and Messenger separately, you can learn how to disable Facebook without losing critical data or connections.
Understanding how to independently deactivate Facebook can ensure brand continuity for enterprise users, while privacy-conscious individuals can benefit from revoking third-party application permissions—a step often overlooked in guidelines on how to permanently deactivate Facebook accounts.
If you are still tired of these social media apps, you can try exploring some new privacy policies or choose to set mute and other features. These strategies can help you achieve the goal of disabling Facebook 2025, which emphasizes user autonomy. Whether you decide to temporarily or permanently deactivate, this guide ensures that you can use Facebook independently and reasonably.
Want to know more about Facebook and social media platforms? Take a look at the following articles:
FAQs
Can I deactivate Facebook but keep Messenger?
A: Yes! Use the browser method and uncheck Messenger deactivation.
Will my friends know I deactivated?
A: Your profile disappears from searches, but messages stay visible.
How to deactivate Facebook 2025 if steps change?
A: Bookmark Facebook’s Help Center for updates.
Why can't I find the deactivation button on Facebook?
Select Settings & Privacy, then click Settings. If Accounts Center is at the top left of your Settings menu, you can deactivate your account through Accounts Center. If Accounts Center is at the bottom left of your Settings menu, you can deactivate your account through your Facebook Settings.
How long does deactivating Facebook last?
Deactivation: You can reactivate your account anytime by logging in. Everything returns, including photos, posts, and friends. This is perfect for those unsure about leaving Facebook. Deletion: Deletion is final after 30 days.
Written by
Kimmy
Published on
May 8, 2025
Share article
Read more
Our latest blog
Webpages in a minute, powered by Wegic!
With Wegic, transform your needs into stunning, functional websites with advanced AI
Free trial with Wegic, build your site in a click!